LO-9-2350-256-12 - Page 35 of 41
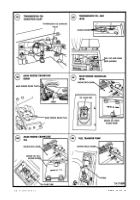
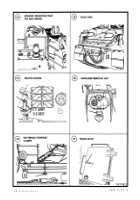
31. HYDRAULIC RESERVOIR DRAIN. Open access door. Before
draining hydraulic system, warm hydraulic fluid by idling main
engine at 675 rpm for 5 minutes with main hydraulic pump
engaged and all hydraulic levers in neutral. Shut down engine
and open hull drain valves. Open hydraulic reservoir drain valve,
After reservoir is drained, close hydraulic reservoir drain valve
and hull drain valves. Refill reservoir (see note 39).
NOTE
Each time hydraulic oil is changed,
hydraulic reservoir filter should be
serviced (see note 40).
Close access door.
32. MECHANICAL TRANSMISSION DRAIN. Remove t
W O
screws, two flat washers and two lockwashers, and remove sub-
floor plate. Drain oil from mechanical transmission semiannually
or every 1500 miles. Start main engine to operate transmission
until warm. Shut down engine and open hull drain valve. Open
mechanical transmission and oil tooter drain valve. After oil has
drained, close mechanical transmission and oil cooler drain valve,
and close hull drain valves. Fill mechanical transmission (see
note 34). Install subfloor plate, two screws, two flat washers and
two lockwashers.
33. MECHANICAL TRANSMISSION AND HYDRAULIC PUMP
SHAFT COUPLING, Remove two screws, two flat washers and
two lockwashers, and remove subfloor plate. Lubricate with GAA
through two fittings. Install subfloor plate and two screws, flat
washers and lockwashers.
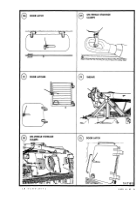
34. MECHANICAL TRANSMISSION FILL AND LEVEL. Remove
two screws, two flat washers and two lockwashers, and remove
subfloor plate. Before operation, remove cap and bayonet gage.
Check that oil level is to the FULL mark on gage. If necessary, fill
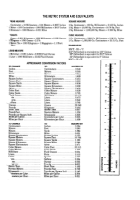
mechanical transmission with oil (see table on card 14 for capac-
ity and type) until FULL mark is reached. Start main engine to
operate mechanical transmission for a few minutes. Stop engine
and check oil Ievel again. Add oil, if necessary. Install subfloor
plate, two screws, two flat washers and two lockwashers.
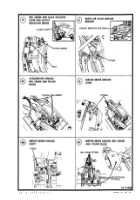
35. BREATHER CAP - MECHANICAL TRANSMISSION. Remove
two screws, two flat washers and two lockwashers, and remove
subfloor plate. Remove breather cap, and clean it with dryclean-
ing solvent (SD-2). Install cap. Install subfloor plate and two
straws, two flat washers and two lockwashers.
36. MECHANICAL TRANSMISSION SHAFT UNIVERSAL JOINT.
Remove four screws, four flat washers and four Iockwashers, and
remove subfloor plate, Remove boot and rotate joint as neces-
sary to obtain access to two grease fittings. Lubricate with GAA
through fittings. Install boot and subfloor plate, and install four
screws, four flat washers and four lockwashers.
WARNING
Never handle cable with bare hands.
Broken or frayed wire strands can
cause severe cuts. Always wear
protective (leather) gloves when
handling cable.
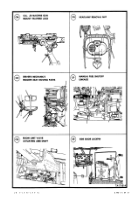
37. MAIN WINCH CABLE.
(a) DAILY, if winch has been used, clean cable and oil with OE.
(b) SEMIANNUALLY. Unwind and clean entire cable. Brush soak
cable with OE and wipe to remove excess oil. Coat winch drum
with CW before rewinding cable. Rewind cable.
38. MAIN WINCH GEAR CASE DRAIN, Open access cover.
Operate main winch to warm oil to operating temperature. Shut
down all systems, Open hull drain valves and open main winch
drain valve. After draining, close main winch drain valve and hull
drain valves, Refill main winch (see note 28) with oil (see table on
card 14 for capacity and type). Close access cover.
39. HYDRAULIC RESERVOIR FILL AND LEVEL. Remove two
screws, two flat washers and two lockwashers, and remove sub-
floor plate. Before operation, remove bayonet gage and check
that oil level in the reservoir measures up to the FULL mark, If
necessary, remove fill cap and add oil (see table on card 14 for
capacity and type) until oil level reaches FULL on bayonet gage.
Install bayonet gage and fill cap. Operate hydraulic system until
hydraulic oil reaches operating temperature. Shut down all sys-
tems and check oil level again. Add oil, if necessary Install sub-
floor plate and install two screws, two flat washers and two
lockwashers.
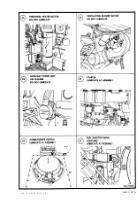
40. HYDRAULIC RESERVOIR FILTER. Remove four screws,
four flat washers and four lockwashers, and remove subfloor
plate under rigger’s seat. Remove eight screws in filter cover, and
remove cover. Remove filter element and clean it with &y-clean-
ing solvent (SD-2); then dry with low pressure compressed air.
Remove preformed gasket from between cover and filter element.
Discard used gasket and install new gasket. Install filter element,
filter cover and eight attaching screws. Operate hydraulic system
and check for leaks. Shut down system and install subfloor plate,
four screws, four flat washers and four lockwashers,
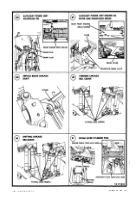
41. STEERING CONTROL ASSEMBLY, Lubricate with GAA
through two fittings.
42. STEERING LINKAGE. Lubricate with GAA through two fit-
tings,
43. STEERING LINKAGE BELL CRANK ASSEMBLY, Lubricate
with GAA through fitting.
44. SERVICE BRAKE PEDAL. Lubricate with GAA through fitting.
45. SERVICE BRAKE LINKAGE. Lubricate with GAA through fit-
ting.
46. SERVICE BRAKE LINKAGE PILLOW BLOCK. Lubricate with
GAA through three fittings.
47. SERVICE BRAKE SHAFT. Lubricate with GAA through two fit-
tings.
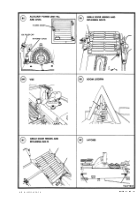
48. ACCELERATOR PEDAL ASSEMBLY, Lubricate with GAA
through fitting.
49. SHIFTING CONTROL ASSEMBLY. Lubricate with GAA
through two fittings.
50. SHIFTING LINKAGE PILLOW BLOCK. Lubricate with GAA
through three fittings.
51. ACCELERATOR LINKAGE PILLOW BLOCK. Lubricate with
GAA through two fittings.
52. MECHANICAL TRANSMISSION SHAFT UNIVERSAL JOINT,
Remove front engine deck grille and lubricate universal joint with
GAA through fitting. Install front engine deck grille,
53. MAIN ENGINE OIL FILTER. Remove front engine deck grille,
Remove oil filter cover and remove elements, Discard removed
elements and install new elements. Install oil filter cover and front
LO 9-2350-256-12
Change 1
CARD 34 of 38
Back to Top

