TM-9-1240-400-34-P - Page 35 of 344
TM 9-1240-400-34&P 9
1
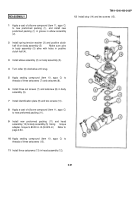
Apply sealant adhesive (item 5, appx C) to threads
of mechanical post (1).
2
Install spring (2), detent plunger (3), and
mechanical post (1) to adapter (4).
3
Install cover (5), torsion spring (6), and rod (7).
4
Pull wire with lamp base through to the front of
overlay assembly (8).
5
Install overlay assembly (8) onto adapter (4).
6
Apply sealant adhesive’ (item 5, appx C) to tips of
three screws (9).
7
Loosely install three new lockwashers (10) and
three screws (9).
8
Apply sealant adhesive (item 5, appx C) to threads
of externally threaded ring (11).
9
Using tubular spanner wrench (7597638), install
externally threaded ring (11) on adapter (4).
10
Insert lamp base portion of overlay assembly (8)
into contact of adapter (4).
11
Position wire in recessed area to accommodate
cap assembly (12).
12
Install cap assembly (12) and two screws (13).
13
Apply sealant adhesive (item 5, appx C) to outer
edge of cap assembly (12).
14
Tighten three screws (9).
Section V.
GENERAL SUPPORT MAINTENANCE
2-10.
MAINTENANCE OF M115 PANORAMIC TELESCOPE.
This task covers:
a.
Disassembly
c.
Repair
b.
Cleaning
d.
Reassembly
INITIAL SETUP:
Equipment Conditions
Tools and Special Tools
M1 15 Panoramic telescope removed from
Shop equipment, electronic: system
M11 A2 howitzer (TM 9-2350-304-20-2)
maintenance, (SC 5180-95-CL-B29)
Torque adapter (figure 4, appx D)
General Safety Instructions
Torque wrench (GGG-W-686)
Materials/Parts
Preformed packing (8587449-2)
Use adhesives, cleaning solvents,
Preformed packing (8587449-5)
and sealing compounds in well-
Sealing compound (item 10, appx C)
ventilated area away from open
Silicone compound (item 11, appx C)
flame.
Adhesives, cleaning sol-
vents, and sealing compounds are
References
harmful to skin and clothing, can
TM 9-254
burn easily, and may give off harm-
ful vapor.
2-19
Back to Top


