TM-9-2320-272-24-1 - Page 756 of 1015
TM 9-2320-272-24-1
3-143. TRANSFER CASE INTERLOCK VALVE REPLACEMENT
THIS TASK COVERS:
a. Removal
b. Installation
INITIAL SETUP:
APPLICABLE MODELS
All (Except M936/A1/A2)
TOOLS
General mechanic’s tool kit (Appendix E, Item 1)
MATERIALS/PARTS
Lockwasher (Appendix D, Item 404)
Two locknuts (Appendix D, Item 306)
Antiseize tape (Appendix C, Item 72)
REFERENCES (TM)
TM 9-2320-272-10
TM 9-2320-272-24P
EQUIPMENT CONDITION
l
Parking brake set (TM 9-2320-272-10).
l
Air reservoirs drained (TM 9-2320-272-10).
l
Dump spare tire carrier removed (M929/A1/A2,
M930/A1/A2) (para. 3-257).
GENERAL SAFETY INSTRUCTIONS
Do not disconnect air lines before draining air
reservoirs.
WARNING
Do not disconnect air lines before draining air reservoirs. Small
parts under pressure may shoot out with high velocity, causing
injury to personnel.
NOTE
l
Replacement of the interlock valve on M936/A1/A2 series
vehicles is not performed at unit level because the transfer
case must be removed. Notify DS maintenance.
l
Tag air lines and wires for installation.
1.
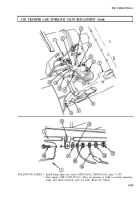
Disconnect interlock valve supply line (6) from elbow (5).
2.
Disconnect air cylinder supply line (1) from elbow (2).
3.
Disconnect vent line (12) from elbow (11).
4.
Disconnect wire (8) from connector (9).
NOTE
Assistant will help with step 5.
5.
Remove locknut (17), washer (18), diode ground wire (19), locknut (20), interlock valve ground
wire (16), lockwasher (21), cable clamp (15), and screw (10) from frame (7). Discard lockwasher (21)
and locknuts (17) and (20).
6.
Remove two screws (14) and interlock valve (3) from bracket (13).
7.
Remove elbows (2), (5), and (11) and adapter (4) from interlock valve (3).
3-392
Back to Top

