TM-9-2320-279-20-3 - Page 241 of 615
TM
9-2320-279-20-3
Non-Electrical Gage Maintenance Instructions (Cont)
22-5.
DPG DIFERENTIAL PRESSURE GAGE REMOVAL/INSTALLATION (M978)
a.
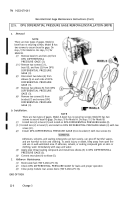
Removal.
NOTE
There are two types of gages. Model A
bezel has no securing screws; Model B has
two screws to secure bezel to gage. Do
step
(1)
for Model A. Do step
(1.1)
for
Model B.
(1)
(1.1)
(2)
(3)
(4)
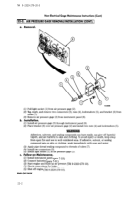
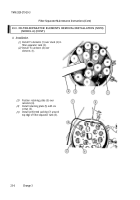
Remove bezel (1) and lens (2) from
DPG DIFFERENTIAL
PRESSURE GAGE (3).
Remove two screws (3.1),
bezel (l), and lens (2) from DPG
DIFFERENTIAL PRESSURE
GAGE (3).
Disconnect two tubes (4) from
elbows (5) on each side of DPG
DIFFERENTIAL PRESSURE
GAGE (3).
Remove two elbows (5) from DPG
DIFFERENTIAL PRESSURE
GAGE (3).
Remove two screws (6) from
bracket (7) and remove DPG
DIFFERENTIAL PRESSURE
GAGE (3).
b.
Installation.
NOTE
There are two types of gages. Model A bezel has no securing screws; Model B has two
(1)
screws to secure bezel to gage. Do step
(1)
for Model A. Do step
(1.1)
for Model B.
Install lens (2) in bezel (1) and install on DPG DIFFERENTIAL PRESSURE GAGE (3).
(1.1)
Install lens (2) in bezel (1) and install on DPG DIFFERENTIAL PRESSURE GAGE (3) with two
screws (3.1).
(2)
Install DPG DIFFERENTIAL PRESSURE GAGE (3) on bracket (7) with two screws (6).
WARNING
Adhesives, solvents, and sealing compounds can burn easily, can give off harmful vapors,
and are harmful to skin and clothing. To avoid injury or death, keep away from open fire
and use in well-ventilated area. If adhesive, solvent, or sealing compound gets on skin or
clothing, wash immediately with soap and water.
(3)
Apply pipe thread sealing compound and install two elbows (5) in DPG DIFFERENTIAL
PRESSURE GAGE (3).
(4)
Connect two tubes (4) to elbow (5).
C.
Follow-on Maintenance.
(1)
Recirculate fuel (TM 9-2320-279-10).
(2)
(3)
Check DPG DIFFERENTIAL PRESSURE GAGE for leaks and proper operation
Close pump module rear access doors (TM 9-2320-279-10).
END OF TASK
22-6
Change 3
Back to Top

