TM-9-2320-280-20-2 - Page 78 of 951
3-29. FUEL TANK FILLER SPOUT VENT LINE REPLACEMENT
This task covers:
a. Removal
b. Installation
a. Removal
1.
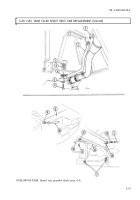
Disconnect vent line (2) from fuel filler spout elbow (3).
2.
Remove locknut (7), washer (5), capscrew (4), and washer (5) securing vent line (2) and clamp (6) to
body (1). Discard locknut (7).
3.
Disconnect and remove vent line (2) from tee (12).
4.
Disconnect vent line (10) from tee (12).
5.
Remove capscrew (15) securing vent line (10) and clamp (11) to body (1).
6.
Loosen two nuts (13) to allow access to elbow (8).
7.
Disconnect vent line (10) from elbow (8) on fuel tank (9), cut vent line (10), and remove vent line
(10) from crossmember (14).
INITIAL SETUP:
Tools
General mechanic’s tool kit:
automotive (Appendix B, Item 1)
Materials/Parts
Locknut (Appendix G, Item 70)
Adhesive (Appendix C, Item 1)
Sealing compound (Appendix C, Item 46)
Manual References
TM 9-2320-280-24P
Equipment Condition
Rear propeller shaft removed (para. 6-4).
b. Installation
NOTE
Use sealing compound on all vent line connector threads before
installation.
1.
Install vent line (10) and connect to elbow (8) on fuel tank (9).
NOTE
Upper and lower straps should be approximately 1/2 in. (12 mm)
apart after tightening locknuts. Straps should not touch when
properly installed. Straps must be replaced if upper and lower
straps touch.
2.
Apply adhesive to threads of nuts (13) and tighten nuts (13) to 23-27 lb-in. (3-5 N
•
m).
3.
Install clamp (11) and vent line (10) to body (1) with capscrew (15).
4.
Route vent line (10) through crossmember (14).
5.
Connect vent line (10) to tee (12).
6.
Install vent line (2) and connect to tee (12).
7.
Install vent line (2) and clamp (6) on body (1) with washer (5), capscrew (4), washer (5), and
locknut (7). Tighten locknut (7) to 6 lb-ft (8 N
•
m).
8.
Connect vent line (2) to fuel filler spout elbow (3).
TM 9-2320-280-20-2
3-56
Change 3
Back to Top


