SMI-9-2320-387-14P-1 - Page 278 of 671
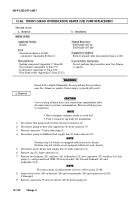
12-86. TROOP/CARGO WINTERIZATION HEATER FUEL PUMP REPLACEMENT
This task covers:
a. Removal
b. Installation
INITIAL SETUP:
Applicable Models
M1152
Tools
General mechanic’s tool kit:
automotive (Appendix B, Item 1)
Materials/Parts
Sealing compound (Appendix C, Item 62)
Two locknuts (Appendix G, Item 77)
Lockwasher (Appendix G, Item 172)
Four blind rivets (Appendix G, Item 271.5)
Manual References
TM 9-2320-387-10
TM 9-2320-387-24P
Equipment Condition
Battery ground cable disconnected (para. 4-68).
General Safety Instructions
Do not perform this procedure near fire, flames,
or sparks.
a. Removal
SMI 9-2320-387-14&P-1
12-130
Change 4
WARNING
Diesel fuel is highly flammable. Do not perform this procedure
near fire, flames, or sparks. Severe injury or death will result.
CAUTION
Cover or plug all open hoses and connections immediately after
disconnection to prevent contamination. Remove all plugs prior
to connection.
NOTE
• Have drainage container ready to catch fuel.
• Prior to removal, tag leads for installation.
1.
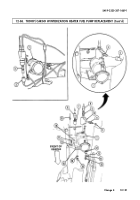
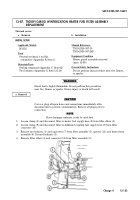
Disconnect fuel pump lead (2) from electrical connector (3).
2.
Disconnect pump-to-hose fuel supply line (6) from connector (7).
3.
Remove connector (7) from fuel pump (1).
4.
Disconnect pump-to-bulkhead fuel supply line (8) from connector (9).
NOTE
Perform step 5 if vehicle is equipped with front arctic heater.
Perform step 6 if vehicle is not equipped with front arctic heater.
5.
Disconnect arctic heater fuel supply line (5) from connector (4).
6.
Remove cap (11) from connector (4).
7.
Remove two locknuts (15), washers (14), lockwasher (12), two capscrews (17), washers (14), fuel
pump (1), and ground lead 799B (13) from bracket (16). Discard locknuts (15) and
lockwasher (12).
NOTE
For instructions on replacement of rivets, refer to para. 10-66.
8.
Inspect four rivets (19) on bracket (16) and crossmember (18) and replace rivets (19),
if damaged.
9.
Remove connectors (9) and (4) and tee (10) from fuel pump (1).
Back to Top

