TM-1-1500-344-23-2 - Page 142 of 240
7-26
NAVAIR 01-1A-509-2
TM 1-1500-344-23-2
15 April 2009
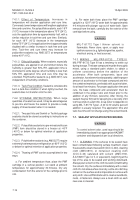
7-9.3. ePTFE SEALING TAPE (Skyflex™) REPAIR. In
order to preserve sealant integrity, it is necessary to
inspect the sealant tape each time an access panel is
removed.
NOTE
The main function of the adhesive backing is to
hold the ePTFE sealant tape in place. Peeling/
delamination of the adhesive from the aircraft
structure/panel requires replacement of any
section of the sealant tape that is not located in
the faying surface.
a. Visually inspect ePTFE sealant material for nicks,
cuts, gouges and delamination/separation.
b. Cut and remove only the damaged section of the
sealant tape. Lift damaged tape section from surface to
cut with scissors; do not cut tape directly on surface to
avoid damage to airframe.
c. Measure and cut a new piece of sealant tape
approximately one inch longer than the removed section.
CAUTION
Ends of repair splice must overlap the existing
sealant to ensure sealant integrity. Use care
not to pull or stretch the ePTFE tape as it is
applied. The stretched ePTFE tape will retract
even if it is clamped between faying surfaces,
which may reduce or eliminate overlap and
allow water intrusion.
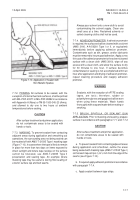
d. Install new sealant tape so it overlaps the
previously installed sealant by
1
⁄
4
to
1
⁄
2
inch on each side
of the repair site.
e. Once sealant tape is applied, run fingers back
and forth on tape to further activate the adhesive. No
curing time is required.
(1)
Applying extra pressure to the sealant tape
will cause the pressure sensitive adhesive to better
adhere to the faying surface and it will create indentations/
discoloration at the fastener holes allowing for easy
identification.
(2)
For some fasteners, it may be necessary to
pre-punch holes in the sealant tape at the affected
fastener locations. Locate holes in repair section and
pre-punch using leather punch with diameter no greater
than
1
⁄
4
inch more than the fastener hole diameter.
f. If sealant without adhesive backing is used for
repair in areas where high fluid exposure is expected,
MMM-A-189 plastic adhesive or equivalent may be
used to hold the ePTFE sealing tape in place. Apply
adhesive to entire length of repair section and apply
ePTFE sealing tape within 20 minutes or before adhesive
is tack free.
g. Puncture any affected fastener hole with a sharp
pointed object such as an awl/scribe or scissors.
NOTE
As fasteners are installed, the ePTFE sealant
material pushed into the fasteners will help seal
against moisture intrusion.
h. Install access panel. All fasteners should be wet
installed with corrosion preventive compound
(MIL-PRF-16173 Grade 4 or equivalent) as specified in
the aircraft maintenance manual.
7-9.4. REINFORCED POLYURETHANE GEL
SEALING TAPE (HI-TAK® TAPE TUFSEAL™)
REPAIR. In order to preserve sealant integrity, it is
necessary to inspect the sealant tape each time a
floorboard is removed.
a. Visually inspect reinforced polyethane gel sealant
tape on floorboard spars for nicks, cuts, gouges, dry
appearance, missing gel, and other indications of
damage which might compromise sealing integrity.
b. Cut and remove only the damaged section of the
sealant tape. Lift damaged tape section from surface to
cut with scissors; do not cut tape directly on surface to
avoid damage to airframe.
c. Clean any residue from the surface using a solvent
(AMS 3166, A-A-59281 Type I or II, or equivalent) and
cheesecloth (CCC-C-440) or a clean cloth (AMS 3819
or equivalent).
d. Measure and cut a new piece of sealant tape
approximately the same length as the removed section.
e. Install new sealant tape, creating a butt joint with
remaining tape sections. Gaps greater than
1
⁄
8
inch shall
not be created at butt joints. A slight excess of tape
(
1
⁄
8
inch to
1
⁄
4
inch) is preferred over insufficient tape to
cover the exposed surface.
f. If the repaired section is over a fastener hole,
there is no need to pre-punch fastener holes prior to
installation of floorboard panels.
Back to Top

