TM-1-1500-344-23-2 - Page 32 of 240
2-8
NAVAIR 01-1A-509-2
TM 1-1500-344-23-2
15 April 2009
2-8. EQUIPMENT OPERATING PROCEDURES
. This
section contains general operating instructions for the
most commonly used large pieces of cleaning equipment.
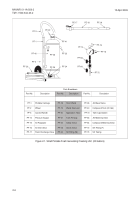
2-8.1. SMALL PORTABLE FOAM GENERATING
CLEANING UNIT.
WARNING
Do not service the small portable foam
generating cleaning unit without releasing
pressure.
a. Release pressure prior to servicing.
NOTE
Refer to manufacturer's instructions to mix the
proper ratio of solution to be used.
b. Remove tank fill cap and fill container with
appropriate diluted cleaning compound. Allow adequate
air space at the top of the tank. Replace filler plug.
c. Connect air supply to air inlet valve on air regulator.
d. Open compound metering valve to full open
position.
e. Open air inlet valve and set air pressure regulator
to 30-70 psi.
f. Open foam discharge valve and direct foam at
object to be cleaned.
g. If foam is too wet, close compound metering
valve slightly.
h. If foam is too dry, open compound metering valve
slightly and close air metering valve slightly.
i. Allow foam to remain on the surface for up to one
minute, but not long enough to dry, then scrub and rinse.
CAUTION
When cleaning task is completed, drain tank
and flush with fresh water to prevent a
concentrated cleaning solution from being used
that could be damaging to aircraft surfaces.
j. When cleaning task is completed, drain detergent
solution from tank and flush with fresh water.
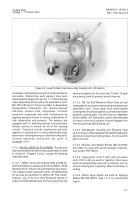
2-8.2. LARGE PORTABLE FOAM GENERATING
CLEANING UNIT.
WARNING
Do not service the large portable foam
generating cleaning unit without releasing
pressure.
a. Release pressure prior to servicing.
b. If tank has been in prior use and is closed, close
cleaning compound valve and air valve, then open air
dump valve to bleed off retained air pressure.
c. Remove cover of tank. The cover is retained by
several draw bolts.
NOTE
Refer to manufacturer's instructions to mix the
proper ratio of solution to be used.
d. Fill with cleaning compound in appropriate dilution,
allowing for adequate air space at the top of the tank.
e. Replace cover, being sure it is firmly locked in
place.
f. Close air and cleaning compound handle valves.
g. Attach air line to air inlet on side of unit. Fill and
check air regulator to ensure proper pressure (30-70 psi).
h. Open air valve.
i. Open cleaning compound valve slowly until
desired foam consistency is reached.
j. Apply foam to surface to be cleaned. Generally,
thin uniform layers perform best. During initial setting of
the unit, air and cleaning compound valves should be
adjusted to give the desired foam consistency.
Combinations of less air and more cleaning compound
make a wet foam. Combinations of more air and less
Back to Top


