TM-9-2320-260-20 - Page 1123 of 1337
TM 9-2320-260-20
I
14-4. PERSONNEL HEATER FUEL PUMP REPLACEMENT
THIS TASK COVERS:
a. Removal
b. Installation
INITIAL SETUP
APPLICABLE MODELS
EQUIPMENT CONDITION
All
●
Parking brake set (TM 9-2320-260-10).
MATERIALS/PARTS
Six locknuts
●
Battery ground cable disconnected (para. 4-48).
GENERAL SAFETY INSTRUCTIONS
Cap and plug set (Appendix C, Item 9)
Keep fire extinguisher nearby when working with
Antiseize tape (Appendix C, Item 30)
open fuel lines.
REFERENCES (TM)
TM 9-2320-260-10
TM 9-2320-260-20P
WARNIN G
Diesel fuel is highly flammable. Do not perform fuel system
procedures near open flame. Injury to personnel may result.
NOT E
Have drainage container ready to catch excess fuel.
1.
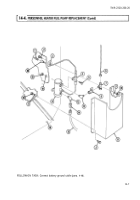
Remove four locknuts (10), washers (9), screws (2), and fuel pump shield
Discard locknuts (10).
2. Disconnect lead (20) from wire (1) and remove lead (20) from grommet (3)
CAUTION
11) from splash shield
in splash shield (16).
Cap or plug all openings immediately after disconnecting lines and
hoses to prevent contamination. Failure to do so may result in fuel
pump damage.
3. Disconnect fuel line (6) from tee (7).
4. Disconnect hose (15) from reducer (14).
5. Remove two locknuts (19), washers (18), screws (5), lead clip (4), and fuel pump (17) from splash
shield (16). Discard locknuts (19).
6. Remove reducer (14), elbow (13), tee (7), shutoff valve (8), and elbow (12) from fuel pump (17).
1. Apply antiseize tape to male threads of tee (7), elbows (12) and (13), and hose (15).
2. Install elbow (12), shutoff valve (8), tee (7), elbow (13), and reducer (14) on fuel pump (17).
3. Install fuel pump (17) and lead clip (4) on splash shield (16) with two
screws
(5),
washers
(18),
and new locknuts (19).
4. Connect hose (15) to reducer (14).
5. Connect fuel line (6) to tee (7).
6. Insert lead (20) through grommet (3) in splash shield (16) and connect to wire (l).
7. Install fuel pump shield (11) on splash shield (16) with four screws (2), washers (9), and new
locknuts (10).
14-6
Back to Top


