TM-9-2320-260-20 - Page 497 of 1337
TM 9-2320-260-20
I
4-30.
HORN, SOLENOID, AND BRACKET REPLACEMENT
I
THIS TASK COVERS:
a. Removal
b. Installation
INITIAL SETUP
APPLICABLE MODELS
EQUIPMENT CONDITION
All
• Parking brake
set
(TM 9-2320-260-10).
MATERIALS/PARTS
•
Hood raised and secured (TM 9-2320-260-10).
• Air reservoirs drained (TM 9-2320-260-10).
Two lockwashers
• Battery ground cable disconnected (para. 4-48).
Antiseize tape (Appendix C, Item 30)
GENERAL SAFETY INSTRUCTIONS
REFERENCES (TM)
Do not disconnect air lines before draining air
TM 9-2320-260-10
reservoirs.
TM 9-2320-260-20P
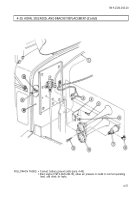
1. Disconnect two wires (2) from solenoid (7).
WARNING
Do not disconnect air lines before draining air reservoirs. Small
parts under pressure may shoot out with high velocity, causing
injury to personnel.
2. Disconnect air line (1) from elbow (6).
3. Remove elbow (6) from horn solenoid (7).
4. Remove horn solenoid (7) from horn (8).
5. Remove two nuts (5), screws (9), and horn (8) from horn bracket (3).
NOTE
Assistant will help with step 6.
6. Remove two nuts (12), lockwashers (11), screws (4), and horn bracket (3) from firewall (10). Discard
lockwashers (11).
b. Installation
1. Apply antiseize tape to male threads of elbow (6).
2. Position horn bracket (3) on firewall (10) and install with two screws (4), new lockwashers (11),
and nuts (12).
3. Install horn (8) on horn bracket (3) with two screws (9) and nuts (5).
4. Install horn solenoid (7) on horn (8).
5. Install elbow (6) on horn solenoid (7).
6. Install air line (1) on elbow (6).
7. Connect two wires (2) to solenoid (7).
4-56
Back to Top

