TM-9-2320-260-34-1 - Page 334 of 657
TM 9-2320-260-34-1
5-8. FUEL INJECTOR (TOP STOP) MAINTENANCE (Contd)
4.
5.
6.
7.
8.
9.
10.
11.
12.
13.
14.
15.
16.
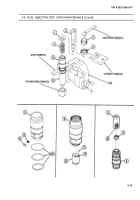
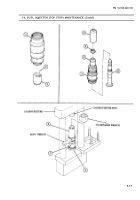
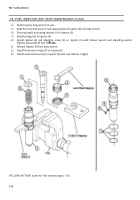
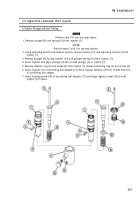
Position locknut wrench on top of locknut (4) and loosen locknut (4).
Position adjusting wrench on adjusting screw (3) and loosen.
Remove adjusting screw (3) and locknut (4) from injector (6).
Remove plunger (2) from injector (6).
Remove spring retainer (1) and plunger spring (7) from injector (6).
Using cup retainer wrench, loosen cup retainer (5).
Remove injector (6) and body wrench from vise.
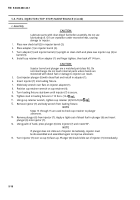
NOTE
Place injector on a flat surface so cup retainer is facing up. This
will prevent cup, barrel, and check ball from falling off injector.
Remove cup retainer (5) from adapter (9).
Remove injector cup (8) from adapter (9). Discard injector cup (8).
Hold injector barrel (13) and adapter (9) together and set upright on a clean cloth. While holding
injector barrel (13), lift adapter (9) straight up.
Tilt injector barrel (13) over until check ball (11) falls out. Discard check ball (11).
Remove three O-rings (14) from adapter (9). Discard O-rings (14).
Remove retaining ring (16) and screen (15) from adapter (9). Discard retaining ring (16) and
screen (15).
b. Cleaning and Inspection
1.
2.
3.
4.
5.
6.
NOTE
Bright spots or surface wear patterns at top of plunger machined
area, on opposite side at bottom or midpoint, are normal results of
rocker lever action.
For general cleaning instructions, refer to para. 2-8.
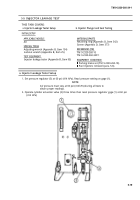
Inspect plunger (2), spring (7), and check ball seat (12) for cracks, breaks, nicks, burrs, excessive
wear, or collapsed coils. Replace part(s) if damaged.
Inspect spring retainer (1) for cracks, breaks, or heavy wear. Replace spring retainer (1) if cracked,
broken, or worn.
Inspect injector barrel (13) for wear or cracks. Replace both injector barrel (13) and plunger (2) if
worn or cracked.
Inspect cup retainer threads (10) for damage. Replace cup retainer (5) if damaged.
Inspect inside and outside cone area of cup retainer (5) for nicks and burrs. Replace cup retainer (5)
if nicked or burred.
5-14
Back to Top


