TM-9-2320-272-23-2 - Page 1361 of 1417
INSTALLATION
NOTE
•
When new solenoid is installed, fitting from old solenoid may be used. Fitting must be
cleaned and inspected for cracks or stripped threads.
•
Male pipe threads must be wrapped with antiseize tape before installation.
•
Assistant will help with Step (1).
1.
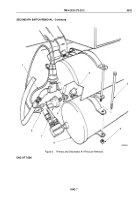
Install bracket (Figure 2, Item 14) on firewall (Figure 2, Item 16) with washer (Figure 2, Item 13), screw
(Figure
2,
Item
12), nut (Figure 2, Item 15), and screw-assembled washer (Figure 2, Item 8).
2.
Install horn (Figure 2, Item 2) on bracket (Figure 2, Item 14) with two screws (Figure 2, Item 1), lockwashers
(Figure 2, Item 11), wire (Figure 2, Item 9), and two nuts (Figure 2, Item 10).
3.
Install horn solenoid (Figure 2, Item 6) on horn (Figure 2, Item 2).
4.
Install elbow (Figure 2, Item 3) on horn solenoid (Figure 2, Item 6).
5.
Connect air line (Figure 2, Item 4) to elbow (Figure 2, Item 3).
6.
Connect wires (Figure 2, Items 6 and 7) to horn solenoid (Figure 2, Item 5).
TM 9-2320-272-23-2
0343
0343-4
Back to Top


