TM-9-2320-272-23-3 - Page 321 of 1469
TRANSMISSION OIL COOLER PRESSURE TEST
CAUTION
Before disconnecting transmission pressure lines, clean surrounding surfaces and plug all
openings to prevent entry of dirt or debris into transmission. Damage will occur if dirt or debris
enters transmission.
1.
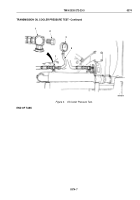
Disconnect oil cooler supply hose (Figure 1, Item 1) from elbow (Figure 1, Item 2) on top of oil cooler
(Figure 1, Item 7).
NOTE
Note elbow alignment for connection.
2.
Loosen nut (Figure 1, Item 3) and remove elbow (Figure 1, Item 2) and o-ring (Figure 1, Item 4) from oil cooler
(Figure 1, Item 7). Discard o-ring.
3.
Using drill press and 21/64 drill bit, drill hole in side of elbow (Figure 1, Item 2) opposite hose port.
4.
Tap hole in elbow (Figure 1, Item 2) with 1/4-18 NPTF tap.
CAUTION
After tapping, elbow must be thoroughly cleaned and all burrs and shavings removed. Any
shavings entering system will damage transmission.
5.
Remove elbow (Figure 1, Item 2) from drill press and thoroughly clean.
6.
Install o-ring (Figure 1, Item 4) and elbow (Figure 1, Item 2) in oil cooler (Figure 1, Item 7) until aligned as noted
in Step (2).
7.
Tighten nut (Figure 1, Item 3) until o-ring (Figure 1, Item 4) is seated.
8.
Install pipe plug (Figure 1, Item 8) on elbow (Figure 1, Item 2).
9.
Connect oil cooler supply hose (Figure 1, Item 1) to elbow (Figure 1, Item 2).
10.
Remove oil sampling valve (Figure 1, Item 6) from elbow (Figure 1, Item 5).
11.
Install pressure gauge (Figure 1, Item 10) and gauge hose (Figure 1, Item 9) on elbow (Figure 1, Item 5).
TM 9-2320-272-23-3
0374
0374-2
Back to Top

