TM-9-2320-272-23-4 - Page 809 of 1393
REMOVAL
CAUTION
Plug all openings to prevent dirt from entering and damaging components.
NOTE
•
Remove and discard tiedown straps holding hoses to vehicle.
•
Have drainage container ready to catch oil.
•
Use drain pans to retain leaking/draining fluids. Refer to local procedures and plans for
preventing and responding to fluid spills or leaks. Comply with local regulations when
disposing of clean up material and leaked and spilled fluids.
•
Perform Steps (1) through (4) for all vehicles except M936/A1/A2.
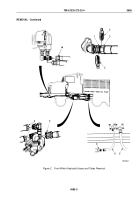
1.
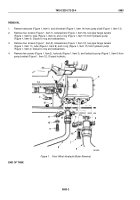
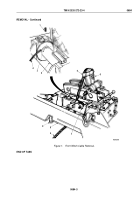
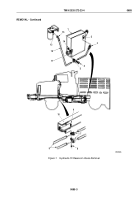
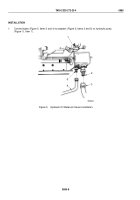
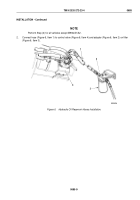
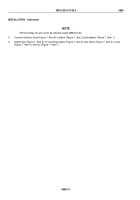
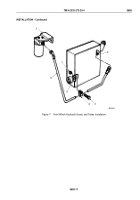
Holding filter adapter (Figure 1, Item 13), loosen hose nut (Figure 1, Item 15) and disconnect hose
(Figure
1,
Item
12) from hydraulic oil reservoir (Figure 1, Item 1).
2.
Remove nut (Figure 1, Item 14), screw (Figure 1, Item 4), and clamp (Figure 1, Item 5) from mounting bracket
(Figure 1, Item 11).
3.
Loosen hose nut (Figure 1, Item 3) and disconnect hose (Figure 1, Item 7) from reservoir elbow
(Figure
1,
Item
2).
4.
Remove hose (Figure 1, Item 7) from reservoir (Figure 1, Item 1).
NOTE
Clamp brackets remain attached to frame rail.
5.
Remove two locknuts (Figure 1, Item 8), screws (Figure 1, Item 6), and two pairs of hose clamps
(Figure
1,
Item
7) from right frame rail (Figure 1, Item 10) and two hydraulic hoses (Figure 1, Item 9).
Discard
locknuts.
TM 9-2320-272-23-4
0685
0685-2
Back to Top

