TM-9-2320-273-34 - Page 209 of 801
TM 9-2320-273-34
/.
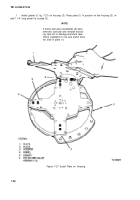
Place cam plate (1, fig. 7-30) in position in cover assembly (2). Use a piece of bar stock with a
straightedge to check the dimension between the surface of the cover assembly and the top surface of the
plate with a thickness gage. Check the dimension in four places the same distance apart. Use the dimen-
sion to determine the amount of shims needed to keep a clearance of 0.001-0.021 in. (0.03-0.28 mm)
between the cover assembly and the plate.
Figure 7-30. Check Cover Assembly and Plate Clearance.
7-31
Back to Top


