TM-9-2320-280-20-2 - Page 242 of 951
4-8. STARTER REPLACEMENT
This task covers:
a. Removal
b.
Installation
WARNING
Starter must be supported during removal and installation.
Failure to support starter may cause injury to personnel or
damage to equipment.
NOTE
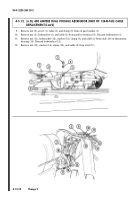
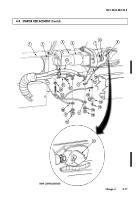
• Illustration shown is a cutaway of the right side of vehicle.
• Prior to removal, tag leads for installation.
1.
Remove nut (18), lockwasher (19), lead 3D (20), and negative cable 7A (23) from starter (5). Discard
lockwasher (19).
2.
Remove adhesive sealant from positive terminal (21) on starter (5).
NOTE
• Perform step 3 for all vehicles except M1123 and “A2” series
vehicles.
• Perform step 4 for M1123 and “A2” series vehicles only.
3.
Remove nut (16), lockwasher (15), leads 81A (11) and 81B (17), and positive cable 6A (4) from
starter (5). Discard lockwasher (15) and tiedown strap (9.1).
4.
Remove nut (16), lockwasher (15), and lead 81B (17) from starter (5). Discard lockwasher (15).
5.
Remove screw (14), clip (13), and leads 74B (12) and 74A (10) from solenoid (6).
6.
Remove screw (22), two clamps (3), negative cable 7A (23), and positive cable 6A (4) from
starter (5).
7.
Loosen plain-assembled nut (8) and washer (7) (if installed) on stud connecting starter (5) to
bracket (9). Discard plain-assembled nut (8).
8.
While supporting starter (5) from under vehicle, remove two capscrews (25) and washers (24) from
starter (5) and engine (1).
9.
Remove starter (5) and shim (2) from engine (1).
a. Removal
INITIAL SETUP:
Tools
General mechanic’s tool kit:
automotive (Appendix B, Item 1)
Special Tools
Crowfoot, 9/16 in. (Appendix B, Item 150)
Torque adapter, 3/4 in. (Appendix B, Item
145)
Socket adapter, 3/8 - 1/2 in. drive
(Appendix B, Item 146)
Materials/Parts
Lockwasher (Appendix G, Item 133)
Lockwasher (Appendix G, Item 137)
Plain-assembled nut (Appendix G, Item 203)
Adhesive sealant (Appendix C, Item 10)
Sealing compound (Appendix C, Item 45)
Personnel Required
One mechanic
One assistant
Manual References
TM 9-2320-280-10
TM 9-2320-280-24P
Equipment Condition
• Battery ground cable disconnected (para. 4-73).
• Arctic heater oil pan shroud removed
(para. 12-48.2).
• Converter housing cover removed (para. 5-19).
• Sealed upper converter housing cover
removed (para. 5-18).
General Safety Instructions
Starter must be supported during removal
and installation.
TM 9-2320-280-20-2
4-16
Change 3
Back to Top

