TM-9-2320-280-20-2 - Page 253 of 951
TM 9-2320-280-20-2
4-28
Change 3
4-13. ELECTRICAL GAUGE REPLACEMENT
This task covers:
a. Removal
b. Installation
INITIAL SETUP:
Tools
General mechanic’s tool kit:
automotive (Appendix B, Item 1)
Materials/Parts
Two lockwashers (Appendix G, Item 169)
Manual References
TM 9-2320-280-10
TM 9-2320-280-24P
Equipment Condition
Battery ground cable disconnected (para. 4-73).
NOTE
• All electrical gauges are removed and installed basically the
same. This procedure covers the temperature gauge.
• Prior to removal, tag all leads for installation.
a. Removal
b. Installation
1.
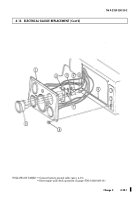
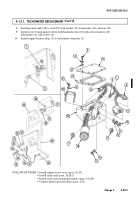
Remove four capscrews (8) from instrument cluster (1) and instrument panel (6).
2.
Pull instrument cluster (1) away from panel (6).
3.
Disconnect leads (4) and (5) from gauge (9).
4.
Remove two nuts (3), lockwashers (7), gauge retaining bracket (2), and gauge (9) from instrument
cluster (1). Discard lockwashers (7).
1.
Install gauge (9) and retaining bracket (2) on instrument cluster (1) with two new lockwashers (7)
and nuts (3). Tighten nuts (3) to 8 lb-in. (1 N
•
m).
2.
Connect leads (4) and (5) to gauge (9).
3.
Install instrument cluster (1) to panel (6) with four capscrews (8).
Back to Top

