TM-9-2320-280-20-2 - Page 255 of 951
Applicable Models
M1123
Tools
General mechanic's tool kit:
automotive (Appendix B, Item 1)
Material/Parts
Gasket (Appendix G, Item 55)
Seven lockwashers (Appendix G, Item 156)
Lockwasher (Appendix G. Item 155)
Two locknuts (Appendix G, Item 72)
Seal (Appendix G, Item 285)
Two lockwashers (Appendix G, Item 138)
Lockwasher (Appendix G, Item 168)
Manual References
TM 9-2320-280-24P
Equipment Condition
• Battery ground cable disconnected
(para. 4-73).
• Radio rack removed (para. 12-132).
• Radio rack mounting brackets removed
(para. 12-130).
• Engine access cover removed (para. 10-15).
TM 9-2320-280-20-2
4-28.2
Change 3
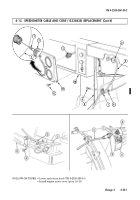
4-13.1. TACHOMETER REPLACEMENT
This task covers:
a. Removal
b. Installation
INITIAL SETUP:
1.
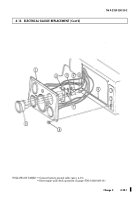
Remove engine harness connector (2) from tachometer connector (1).
2.
Remove seven screws (4), lockwashers (3), washers (25), cover (5), and gasket (24) from
tach/hourmeter box (18). Discard lockwashers (3) and gasket (24).
3.
Remove nut (33), lockwasher (34), ground cable (32), and washer (35) from stud (27).
Discard lockwasher (34).
4.
Remove locknut (36), washer (31), and safety lanyard (30) from stud (28). Discard locknut (36).
5.
Remove locknut (37), washer (38), and washer (39) from stud (26) and remove tach/hourmeter
box (18) from engine access cover (29). Discard locknut (37).
6.
Remove seal (40) from tach/hourmeter box (18). Discard seal (40).
7.
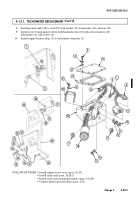
Remove nut (15), washer (14), washer (6), and screw (7) from tach/hourmeter box (18).
8.
Remove two nuts (21), lockwashers (22), and bracket (19) from tach/hourmeter box (18).
Discard lockwashers (22).
9.
Remove nuts (13) and (17) from cable connectors (8) and (23).
10.
Remove nut (10), lockwasher (11), washer (12), toggle switch (9), cable connectors (8) and (23),
and tachometer (16) from tach/hourmeter box (18) Discard lockwasher (11).
1.
Install cable connectors (8) and (23) to tach/hourmeter box (18) with nuts (13) and (17).
2.
Install toggle switch (9) in tach/hourmeter box (18) with washer (12), lockwasher (11), and nut (10).
3.
Install tachometer (16) to tach/hourmeter box (18) with bracket (19), two lockwashers (22), and
nuts (21).
4.
Install screw (7), washer (6), washer (14), and nut (15) on tach/hourmeter box (18).
5.
Install seal (40) on tach/hourmeter box (18).
6.
Install tach/hourmeter box (18) on engine access cover (29) with washer (39), washer (38), and
locknut (37).
7.
Install safety lanyard (30) to stud (28) with washer (31) and locknut (36).
b. Installation
a. Removal
Back to Top


