TM-9-2320-280-20-2 - Page 605 of 951
5-14. MODULATOR ASSEMBLY REPLACEMENT (3L80)
This task covers:
a. Removal
b. Installation
INITIAL SETUP:
Applicable Models
All vehicles except: M997A2, M1025A2,
M1035A2, M1043A2, M1045A2, M1097A2
Tools
General mechanic's tool kit:
automotive (Appendix B, Item 1)
Materials/Parts
Packing retainer (Appendix G, Item 230)
Manual References
TM 9-2320-280-10
TM 9-2320-280-24P
Equipment Condition
• Hood raised and secured (TM 9-2320-280-10).
• Engine access cover removed (para. 10-15).
General Safety Instructions
Allow transmission to cool before performing this
task.
WARNING
Allow transmission to cool before performing this task. Failure to
do this may cause injury.
1.
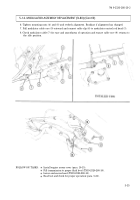
Pull off cable clip (6) from modulator control rod head (3).
2.
Loosen mounting nuts (8) and (4) on cable bracket (1) and remove cable (7) and washer (5) from
bracket (1).
3.
Underneath vehicle, remove capscrew (11) and modulator retaining clip (12) from transmission (13).
NOTE
Have drainage container ready to catch fluid.
4.
Remove modulator (10) and packing retainer (14) from transmission (13). Discard packing
retainer (14).
1.
Install packing retainer (14) on modulator (10) and install modulator (10) in transmission (13).
2.
Install modulator retaining clip (12) on transmission (13) with capscrew (11). Tighten capscrew (11)
to 18 lb-ft (24 N
•
m).
NOTE
Do not tighten mounting nuts.
3.
Position modulator cable (7) through cable bracket (1) and install washer (5) and start mounting
nut (4).
CAUTION
Ensure cable is clear of exhaust system or other sources of
extreme heat to prevent damage to equipment.
4.
Pull modulator control rod (2) to the rear until stop is engaged and hold in position.
5.
With modulator cable core (9) in idle position (cable core (9) is extended), adjust modulator
mounting nuts (4) and (8) until modulator control rod head (3) and cable clip (6) align.
b. Installation
a. Removal
TM 9-2320-280-20-2
5-34
Change 3
Back to Top

