TM-9-2320-280-20-2 - Page 755 of 951
This task covers:
a. Removal
b. Installation
INITIAL SETUP:
Applicable Models
M997A2, M1025A2, M1035A2, M1043A2,
M1045A2, M1097A2
Tools
General mechanic’s tool kit:
automotive (Appendix B, Item 1)
Special Tools
Crowfoot, 7/8 in. (Appendix B, Item 153)
Socket adapter (Appendix B, Item 146)
Materials/Parts
Cotter pin (Appendix G, Item 15)
Spring tension washer (Appendix G, Item 319)
Two sleeve bearings (Appendix G, Item 3)
Grease (Appendix C, Item 22)
Manual References
TM 9-2320-280-10
TM 9-2320-280-24P
Equipment Condition
• Protective control box removed (para. 4-5).
• Stoplight switch removed (para. 4-61)
1.
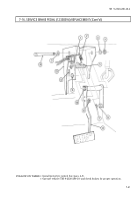
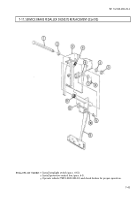
Disconnect return spring (4) from brake pedal bracket (12).
2.
Remove cotter pin (8) and washer (7) securing hydro-boost pushrod (6) to brake pedal bellcrank (10),
and disconnect hydro-boost pushrod (6) from brake pedal bellcrank (10). Remove spring tension
washer (9) from bellcrank (10). Discard cotter pin (8) and spring tension washer (9).
3.
Remove nut (5), washer (2), pivot pin (1), and washer (2) securing brake pedal assembly (11) to
bracket (3) and remove brake pedal assembly (11).
4.
Remove two sleeve bearings (13) from brake pedal assembly (11). Discard sleeve bearings (13).
1.
Apply grease to inside of two sleeve bearings (13). Install two sleeve bearings (13) in brake pedal
assembly (11).
2.
Install brake pedal assembly (11) on bracket (3) with washer (2), pivot pin (1), washer (2), and
nut (5). Using adapter and crowfoot, tighten nut (5) to 60 lb-ft (81 N
•
m).
3.
Install spring tension washer (9) on brake pedal bellcrank (10). Connect hydro-boost pushrod (6) to
brake pedal bellcrank (10) with washer (7) and cotter pin (8).
4.
Connect return spring (4) to brake pedal bracket (12).
b. Installation
a. Removal
TM 9-2320-280-20-2
7-42
Change 3
7-17. SERVICE BRAKE PEDAL (EX 5935037) REPLACEMENT
Back to Top


