TM-9-2320-280-20-3 - Page 533 of 1168
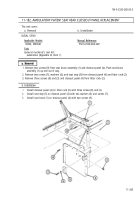
11-185. AIR INTAKE DUCT DOOR REPLACEMENT
This task covers:
a. Removal
b. Installation
a. Removal
1.
Remove push on nut (6) and slide control cable (5) off arm (7). Discard push on nut (6).
2.
Remove two capscrews (4) and lockwashers (3) from duct door (2) and intake duct (8). Discard
lockwashers (3).
3.
Slide duct door (2) right, and remove duct door (2) and bushing (1) from intake duct (8) and
bracket (9).
NOTE
Evaporator intake duct door and heater intake duct door are
replaced basically the same. This procedure covers the evaporator
duct door.
INITIAL SETUP:
Applicable Models
M997, M997A1, M997A2
Tools
General mechanic’s tool kit:
automotive (Appendix B, Item 1)
Materials/Parts
Push on nut (Appendix G, Item 227)
Two lockwashers (Appendix G, Item 134)
Manual References
TM 9-2320-280-10
TM 9-2320-280-24P
Equipment Condition
• Air intake filter removed (TM 9-2320-280-10).
• Blower housing opened (para. 11-198).
b. Installation
1.
Install bushing (1) on bracket (9).
2.
Install arm (7) through intake duct (8) and slide duct door (2) left into bushing (1).
3.
Install duct door (2) on intake duct (8) with two lockwashers (3) and capscrews (4).
4.
Slide control cable (5) onto arm (7) with push on nut (6).
TM 9-2320-280-20-3
Change 2
11-269
FOLLOW-ON TASKS: • Install air intake filter (TM 9-2320-280-10).
• Adjust duct door control cable (para. 11-199).
Back to Top

