TM-9-2320-361-24-2 - Page 26 of 1144
TM 9-2320-361-24-2
0190 00
0190 00-2
TOE-IN CHECK AND ADJUSTMENT (Contd)
TOE-IN CHECK
NOTE
• Ensure vehicle is on a level surface when performing this
procedure.
• Ensure all steering system components are tight. If any
steering component is damaged, replace. If loose, tighten.
• Steps 1 through 3 will determine centerline of tire.
• “Point of Measurement” for checking toe-in will be where lines
marked in steps 1 and 3 intersect.
1.
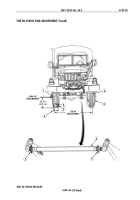
Mark line (1) on center tread (2) of tire (3) 18.3 in. (46.5 cm) from ground.
2.
Measure total width of tire tread (4) and record.
3.
Mark line (5) on center tread (2) at one-half total tread width (4).
4.
Repeat steps 1 through 3 for opposite tire.
5.
Measure distance between “Points of Measurement” on front side of tires (3) and record.
6.
Rotate tires (3) by moving vehicle forward until “Points of Measurement” are 18.3 in. (46.5 cm)
above the ground at rear side of tires (3).
7.
Measure distance between “Points of Measurement” on rear side of tires (3) and record.
NOTE
• If measurement is larger on front side of tires than
measurement on rear side of tires, tires have toe-out.
• If toe-in alignment does not meet specifications, repeat
checking procedures to eliminate any possible reading errors.
8.
Subtract measurement from front side of tires (3) step 5, from measurement from rear side of
tires (3) step 7. The result of this subtraction represents inches of toe-in. Proper toe-in is
0.13 in. ± 0.06 in. (3.2 mm + 1.6 mm).
TOE-IN ADJUSTMENT
1.
Loosen two nuts (7) at each end of tie rod (6).
2.
Turn tie rod (6) in 1/2 turn increments and measure toe-in until toe-in of 0.13 in. ± 0.06 in.
(3.2 mm ± 1.6 mm) is obtained.
3.
When correct toe-in is obtained, tighten two nuts (7) 60 lb-ft (81 N
•
m).
4.
Release parking brake (TM 9-2320-361-10).
Back to Top

