TM-9-2320-361-24-2 - Page 968 of 1144
TM 9-2320-361-24-2
0455 00
0455 00-10
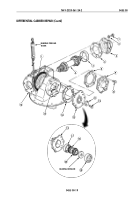
DIFFERENTIAL CARRIER REPAIR (Contd)
CLEANING AND INSPECTION (Contd)
12.
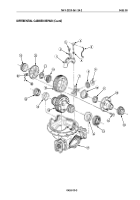
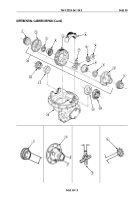
Inspect pinion (5) for chips, breaks, cracks, burrs, or uneven wear. Replace pinion (5) and helical
drive gear (10) if chipped, broken, cracked, burred, or worn unevenly.
13.
Measure outside diameter of hub on pinion (5). Refer to table 2, Wear Limits, for measurements.
Replace pinion (5) and helical drive gear (10) if not within wear limits.
14.
Inspect rear bearing (6) for chips or distortion. Replace bearing (6) if chipped or distorted.
15.
Measure inside diameter of inner race on rear bearing (6). Refer to table 2, Wear Limits, for
measurements. Replace rear bearing (6) if not within wear limits.
16.
Inspect shaft (4) for chips, breaks, cracks, burrs, or uneven wear. Replace shaft (4) if chipped,
broken, cracked, burred, or worn unevenly.
17.
Measure outside diameter of shaft (4) at spline (9) where front bearing (3) fits. Refer to table 2.
Wear Limits, for measurements. Replace shaft (4) if not within wear limits.
18.
Measure outside diameter of shaft (4) at spline (8) where pinion (5) fits. Refer to table 2, Wear
Limits, for measurements. Replace shaft (4) if not within wear limits.
19.
Inspect bearing (3) for chips or distortion. Replace bearing (3) if chipped or distorted.
20.
Measure inside diameter of inner race on front bearing (3). Refer to table 2, Wear Limits, for
measurements. Replace bearing (3) if not within wear limits.
21.
Measure outside diameter of bearing seat (1). Refer to table 2, Wear Limits, for measurements.
Replace bearing (3) and bearing seat (1) if not within wear limits.
22.
Measure outside diameter of bearing seat (7). Refer to table 2, Wear Limits, for measurements.
Replace rear bearing (6) and bearing seat (7) if not within wear limits.
23.
Measure diameter of bearing seats (1) and (7) openings in carrier housing (2). Refer to table 2,
Wear Limits, for measurements. Replace housing and cap assembly (2) if not within wear limits.
Table 2. Wear Limits.
ITEM NO.
ITEM/POINT OF MEASUREMENT
WEAR LIMITS/TOLERANCE
INCHES
MILLIMETERS
1
2
3
4
5
6
7
Bearing seat (outside diameter)
Carrier housing (inside diameter):
Outer race (1) opening
Outer race (7) opening
Bearing (inside diameter of inner race)
Shaft:
Outside diameter at front bearing (9) end
Outside diameter at pinion (8) end
Pinion (outside diameter of hub)
Bearing (inside diameter of inner race)
Bearing seat (outside diameter)
3.250—3.251
3.250—3.251
4.331—4.332
1.687—1.688
1.688—1.689
1.626—1.627
2.500—2.510
2.500—2.501
4.331—4.332
82.550—82.575
82.550—82.575
110.007—110.033
42.850—42.875
42.875—42.901
41.300—41.326
63.500—63.754
63.500—63.525
110.007—110.033
Back to Top


