TM-9-2320-361-34 - Page 265 of 764
TM 9-2320-361-34
I
10-9. TANDEM AXLE REPLACEMENT
THIS TASK COVERS:
—
a. Removal
b. Installation
REFERENCES (TM)
TM 9-2320-361-20
INITIAL SETUP
APPLICABLE MODELS
All
TOOLS
General mechanic’s tool kit
(Appendix B, Item 1)
Torque wrench, 3/4-in. dr. (Appendix B, Item 6)
1-5/16-in. socket, 3/4-in. dr.
(Appendix B, Item 31)
Handle, socket wrench, 3/4-in. dr.
(Appendix B, Item 35)
Jack stands
MATERIALS/PARTS
Twelve locknuts (Appendix F, Item 104)
PERSONNEL REQUIRED
TM 9-2320-361-34P
EQUIPMENT CONDITION
●
Lower
torque
rods
removed
(tandem
axle
end only)
(TM 9-2320-361-20).
. Rear spring seats removed (TM 9-2320-361-20).
GENERAL SAFETY INSTRUCTIONS
●
Weight of vehicle must be supported on jack
stands at all times.
. Tandem axle is heavy. Support tandem axle
during removal and installation.
Two
WARNING
Weight of vehicle must be supported on jack stands at all times. Do
not attempt to support weight of vehicle on hydraulic jack. Injury or
death to personnel may result if jack fails.
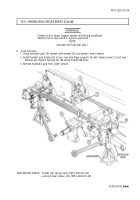
1. Install jack stands under frame of vehicle behind rear-rear axle (3).
a. Removal
2. Position hydraulic jack under center of tandem axle bracket (5).
WARNING
Tandem axle is heavy. Support tandem axle during installation.
Failure to do so may result in injury to personnel or damage to
equipment.
3. Remove twelve locknuts (4) and screws (1) from tandem axle bracket (5) and two rear axle bogie
supports (2). Discard locknuts (4).
NOTE
Assistant will help with step 4.
4.
Lower hydraulic jack and remove tandem axle bracket (5) from vehicle.
10-48
Back to Top


