TM-9-2320-366-20-5 - Page 802 of 1158
TM 9-2320-366-20-5
Section II. MAINTENANCE PROCEDURES
22-2. M1089 AMBER WARNING LIGHT ASSEMBLY REPAIR
This task covers:
a. Disassembly
b. Assembly
c. Follow-On Maintenance
INITIAL SETUP
Tools and Special Tools
Tool Kit, Genl Mech (Item 46, Appendix C)
Vise, Machinist (Item 48, Appendix C)
Wrench, Torque, 0-200 lb-in. (Item 59, Appendix C)
Socket Set, Socket Wrench (Item 36, Appendix C)
Materials/Parts
Adhesive (Item 5, Appendix D)
Nut, Plain, Hex (Item 127, Appendix G)
Materials/Parts (Cont)
Nut, Self-Locking (2) (Item 128, Appendix G)
Nut, Self-Locking (6) (Item 167, Appendix G)
Grommet, Nonmetallic (Item 47, Appendix G)
Lockwasher (4) (Item 77, Appendix G)
Washer, Nylon (3) (Item 185, Appendix G)
Washer, Nylon (3) (Item 284, Appendix G)
Insert, Nylon (3) (Item 57, Appendix G)
Insert, Nylon (2) (Item 59, Appendix G)
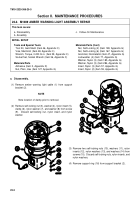
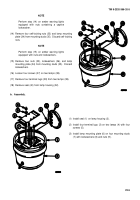
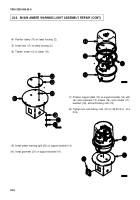
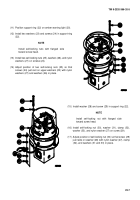
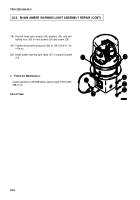
a. Disassembly.
(1) Remove amber warning light cable (1) from support
bracket (2).
NOTE
Note location of clamp prior to removal.
(2) Remove self-locking nut (3), washer (4), nylon insert (5),
clamp (6), nylon washer (7), and washer (8) from screw
(9).
Discard self-locking nut, nylon insert, and nylon
washer.
(3) Remove two self-locking nuts (10), washers (11), nylon
inserts (12), nylon washers (13), and washers (14) from
screws (15). Discard self-locking nuts, nylon inserts, and
nylon washers.
(4) Remove support ring (16) from support bracket (2).
22-2
Back to Top

