TM-9-2320-386-24-1-1 - Page 662 of 1078
DISASSEMBLY
.
WARNING
.
Ensure tire is completely deflated before attempting to remove
from rim. Failure to do so may cause injury to personnel.
Do not remove tire locknuts before deflating tire. Clamp ring can
fly off, resulting in injury to personnel.
CAUTION
Loosen locknuts no more than 1/2-turn at a time. Uneven beadlock
pressure on clamp ring may result in damage to wheel rim studs.
1.
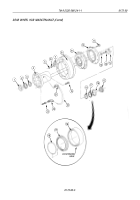
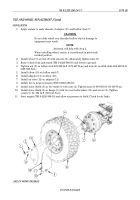
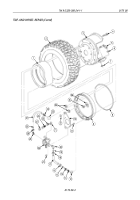
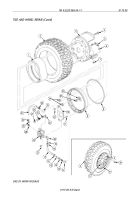
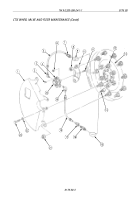
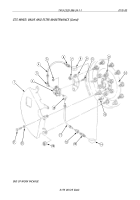
Remove nut (35) and counterweight (36) from stud (4).
2.
Loosen nuts (16) and (18) and remove air tube (17) with sleeves (15) and (19) from connector (14)
and elbow (20).
3.
Remove connector (14) and adapter (13) from elbow (12).
CAUTION
Position and location of elbows must be noted prior to removal.
Failure to do so may cause kinking of air lines when installed.
4.
Remove elbow (12) from turret valve (5).
5.
Remove elbow (20) from air valve (24).
6.
Remove air hose (31) from adapter (32) and elbow (33).
7.
Loosen nut (29) and remove air hose (31) with sleeve (30) from elbow (28).
8.
Remove elbow (28) from air valve (24).
9.
Remove adapter (32) from elbow (33).
10.
Remove cap (27), valve core (26), and valve (25) from elbow (21).
NOTE
Mark position of air valve for installation.
Relationship of air valve to hollow stud is important for proper
installation.
11.
Remove elbow (21) from air valve (24).
12.
Remove two nuts (22) and mounting bracket (10) from outer rim (9) and two studs (4).
13.
Remove four locknuts (23), screws (11), and air valve (24) from mounting bracket (10). Discard
locknuts (23).
14.
Remove ten locknuts (34), outer rim (9), O-ring (8), and tire (2) from inner rim (3) and ten studs (4).
Discard locknuts (34) and O-ring (8).
15.
Remove nut (7), turret valve (5), and grommet (6) from inner rim (3).
16.
Remove beadlock (1) from tire (2).
TM 9-2320-386-24-1-1
0175 00
TIRE AND WHEEL REPAIR (Contd)
0175 00-2
Back to Top

