TM-9-2320-387-24-2 - Page 931 of 1555
TM 9-2320-387-24-2
25-56
Change 1
25-20. A/C COMPRESSOR REPLACEMENT
This task covers:
a. Removal
b. Installation
a. Removal
INITIAL SETUP:
Applicable Models
M1114
Tools
General mechanic’s tool kit:
automotive (Appendix B, Item 1)
Materials/Parts
Seal washer (Appendix G, Item 423.1)
Seal washer (Appendix G, Item 423.2)
Three lockwashers (Appendix G, Item 198)
Lockwasher (Appendix G, Item 239)
Manual References
TM 9-2320-387-24P
Equipment Condition
• Battery ground cables disconnected (para. 4-68).
• Serpentine belt removed (para. 3-81).
• Air horn-to-air cleaner elbow removed (para. 3-15).
• A/C system discharged (para. 25-15).
Maintenance Level
Direct support
1.
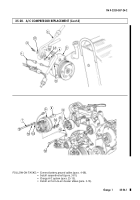
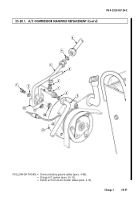
Disconnect body wiring harness lead (1) from A/C compressor lead (6).
2.
Remove screw (7), lockwasher (10), washer (12.2), and spacer (8) from A/C compressor (5). Discard
lockwasher (10).
3.
Remove capscrew (2), lockwasher (2.1), compressor manifold (3), and seal washers (4) and (3.1) from
A/C compressor (5). Discard lockwasher (2.1), seal washers (4) and (3.1).
4.
Remove two nuts (11), lockwashers (10), capscrews (12.1), and A/C compressor (5) from bracket (9)
and idler bracket (12). Discard lockwashers (10).
1.
Install A/C compressor (5) on bracket (9) and idler bracket (12) with two capscrews (12.1),
lockwashers (10), and nuts (11). Do not tighten nuts (11).
2.
Install seal washers (4) and (3.1) on compressor manifold (3).
3.
Install compressor manifold (3) on A/C compressor (5) with lockwasher (2.1) and capscrew (2).
4.
Install spacer (8) between A/C compressor (5) and bracket (9) with lockwasher (10), washer (12.2),
and capscrew (7).
5.
Connect body wiring harness lead (1) to A/C compressor lead (6).
6.
Tighten nuts (11).
b. Installation
Back to Top

