TM-9-2350-311-10 - Page 578 of 775
TM 9--2350--311--10
5--46
Change 4
5--4
PREPARATION FOR FIRING — CONTINUED
d. Projectiles — Continued
(1) Verifies that the projectile is the type designated by the fire commands.
NOTE
A projectile with a burred rotating band will be put aside until the burrs can be removed with a file.
(2) Removes grommet and examines rotating band to ensure that it is free from all dirt and burrs.
(3) Cannoneer removes lifting plug and gasket and examines the fuze well for leaks or damage to
the filler. If any high-explosive filler residue clings to the threads of the fuze well, the round is
rejected and another one is used to complete the fire mission.
WARNING
Dirt or grease left on the projectile rotating band could cause failure of the projectile to seat
properly in the forcing cone. Firing of an unseated projectile could result in inbore explosion
causing injury or death to personnel.
NOTE
Any sand, dirt, oil, or grease left on the projectile will cause wear, scratches, or gouges in the
bore.
(4) Cannoneer examines the entire projectile for defects and checks to see that the projectile is
not damaged or corroded and is free of dirt, grease, sand, and oil. Slight rust on the projectile
is acceptable.
(b) Cannoneer holds the projectile upright for fuzing and fuze setting.
(1) If required, cannoneer holds the projectile firmly while another cannoneer fuzes the projectile
and sets the fuze.
(2) When directed, cannoneer reads and announces the time set on the fuze.
WARNING
Care must be exercised in placing the ammunition in the hull to prevent damage to the rotating
band or fuze and bodily harm to the ammunition handler.
(c)
Cannoneer carries fuzed projectile to the howitzer and places it where it will be convenient for
loading.
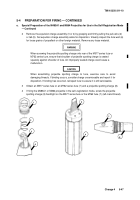
e. Special Preparation of the M483A1 and M864 Projectiles for Use in the Self-Registration Mode
When the command for use of the M483A1 or M864 ICM projectile includes the self-registration mode, the expulsion
charge inside the nose of the projectile must be removed and a projectile spotting charge threaded on the fuze as
follows.
1
Remove the fusible or universal lifting plug (1) with attached gasket. When lifting plug is removed, the
compressed coiled pull-wire (2) on the bagged expulsion charge assembly (3) will expand and protrude
beyond the fuze well of the projectile ogive. If the projectile is assembled with the cylindrical plastic
expulsion charge assembly (4), the tab (5) will pop up.
Back to Top


