TM-9-2815-224-34-P - Page 116 of 554
TM 9-2815-224-34&P
Crankshaft Maintenance Instructions (Cont)
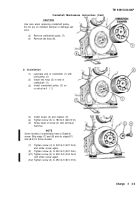
4-3. VIBRATION DAMPER REMOVAL/INSTALLATION (CONT).
(3)
Remove vibration damper (3).
(4)
Turn cone (5) clockwise and remove from
crankshaft (2) inside trunnion support (6).
NOTE
Some engine models contain a cone with a
preformed packing to provide better oil seal
capability. Replace all cones with cone and
preformed packing combinations. Perform
step
(4.1)
for those models. Refer to
TM 9-2320-279-24P
(4.1)
Remove preformed packing (4.1) from
cone (5).
(5)
Position damper (3) in soft jaw vise.
(6)
Remove eight screws (7), scuff plate (8),
and hub (9) from vibration damper (3).
(7)
Remove two pins (10) from hub (9).
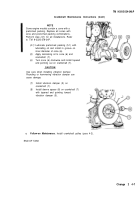
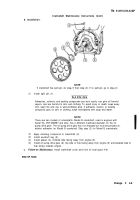
b. Installation.
(1)
Install two pins (1) in unthreaded bores
in hub (2).
(2)
Press two pins (1) through hub (2) until
pins stick out from hub 3/8 in. (9.5 mm).
(3)
Install eight screws (3), scuff plate (4),
and hub (2) in vibration damper (5).
(4)
Tighten eight screws (3) to 75 to 85 lb-ft
(102 to 115 N•m).
4-8
Change 2
Back to Top


