TB-9-2320-335-13-P - Page 238 of 680
TB 9-2320-335-13&P
8-18
WARNING
Do not use a hammer or apply heat to the pitman arm. Failure to
comply may result in injury to personnel or damage to equipment.
8.
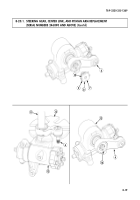
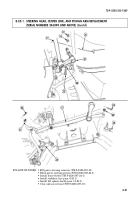
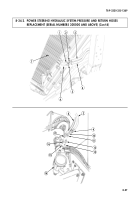
Remove two cotter pins (2) and slotted nuts (3) from idler arm (5), pitman arm (4), and
center link (1). Discard cotter pins (2).
9.
Disconnect center link (1) from idler arm (5) and pitman arm (4).
10.
Using screwdriver, bend locking tab (9) on lock ring (10) away from slot (7) in bolt (8).
11.
Remove bolt (8) and lock ring (10) from pitman arm (4).
12.
Using press (11) and support plate (12) remove pitman arm (4) from steering gear (13).
WARNING
Proper pitman arm installation is critical to safe operation of vehicle.
1.
Install pitman arm (4) onto the steering gear (13) taking care to match alignment marks (14).
WARNING
Do not back off torque value to align locking tabs.
2.
Secure pitman arm (4) to steering gear (13) with bolt (8) and lock ring (10). Tighten bolt (8) to
225 lb-ft (305 N
•
m),
3.
Continue to torque bolt (8) past specified value until one locking tab (9) aligns with pitman arm (4)
and one locking tab (9) aligns with bolt (8).
4.
Bend locking tabs (9) into the slot (7) of bolt (8).
5.
Install center link (1) on pitman arm (4) and idler arm (5) with two slotted nuts (3). Tighten slotted
nuts (3) to 110–130 lb-ft (149–176 N
•
m)
.
CAUTION
Do not loosen slotted nuts to install cotter pins. Doing this may
result in damage to equipment.
6.
Install two cotter pins (2) in slotted nuts (3).
b. Installation
2
3
1
2
3
4
5
8-20.1. STEERING GEAR, CENTER LINK, AND PITMAN ARM REPLACEMENT
(SERIAL NUMBERS 246890 AND ABOVE) (Cont’d)
Back to Top


