TB-9-2510-251-13 - Page 193 of 624
2-177
TB 9-2510-251-13
2-2.2
Installation of Air Conditioning Kit to M998 and M998A1 Four-Door with O'Gara Hess
Add-on-Armor (Cont’d).
b. Install Evaporator and Condenser
WARNING
When drilling through floor, use caution not to damage or drill into the fuel tank.
Failure to comply may cause damage to equipment and/or injury to personnel.
1
3
2
7
9
6
HIDDEN
8
HIDDEN
8
HIDDEN
5
4
5
HIDDEN
10
HIDDEN
11
HIDDEN
11
HIDDEN
HIDDEN
10
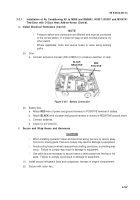
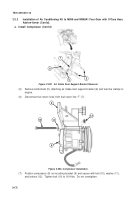
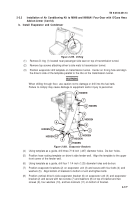
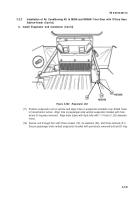
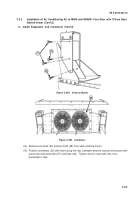
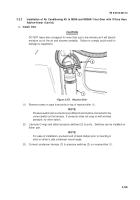
Figure 2-259.
D-Ring
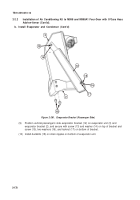
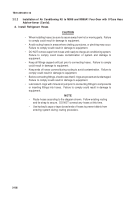
Figure 2-260.
Evaporator Brackets
(1)
Remove D-ring (1) located near passenger side seat on top of transmission tunnel.
(2)
Remove top screws attaching driver’s side mats to transmission tunnel.
(3)
Position evaporator drill template on transmission tunnel.
Center on D-ring hole and align
the driver’s side of the template parallel to the ribs on the transmission tunnel.
(4)
Using template as a guide, drill three 7/16 inch (.437) diameter holes.
De-burr holes.
(5)
Position hose routing template on driver’s side fender well.
Align the template to the upper
front corner of the fender well.
(6)
Using template as a guide, drill four 1 1/4 inch (1.25) diameter holes and de-burr.
(7)
Position evaporator brackets (2) on evaporator unit (3) and secure with four bolts (4) and
washers (5).
Align bottom of brackets to bottom of unit and tighten bolts.
(8)
Position vertical driver’s side evaporator bracket (6) on evaporator unit (3) and evaporator
bracket (2) and secure with two screws (7) and washers (8) on top of bracket and two
screws (9), four washers (10), and two locknuts (11) on bottom of bracket.
Back to Top

