TM-5-3805-254-14-P-2 - Page 452 of 894
FRAMES
MOTOR TRUCK SERVICE MANUAL
GENERAL
Since the frame is depended upon to keep the major
components of a vehicle in their relative positions, it is
highly important that the frame be kept in good condition
at all times.
TYPES
Because International chassis are manufactured with
frame rails of either cold rolled steel, heat treated steel,
or aluminum alloy, each must be handled in a specific
manner to assure maximum service life.
IDENTIFICATION
No unusual difficulty should be encountered in
identifying aluminum alloy frames.
These side rails and
cross members are made of thicker material than are the
components of a comparative size steel frame.
If there
is any doubt, use a file to expose the material hardness
or color.
There are several methods of identifying heat
treated frame rails, the most common of which is a
stencil marking on the inside middle section of the rail or
a stencil mark on one of the cross members.
The stencil
notes that the rail is heat treated and rail flanges must
not be drilled or welded.
This is to caution against the
welding of addi-tional brackets or crossmembers or the
weld-ing of full length reinforcement rails.
Minor repairs
as indicated in later paragraphs are acceptable.
A number of the heat treated frame rails have small
patches covering “Brinell” test mark along the inside
(web) of the rail.
These patches are at about three or
four foot intervals.
The patch can be removed to expose
the “Brinell” marking.
Some rails are stamped “H” for heat treat-ed, on the
upper face of the rail flange about three inches from the
rail end.
ALIGNMENT
Method Of Checking
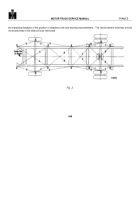
A satisfactory method of checking the frame and
axle alignment, particularly when a body and cab is on a
chassis, is to mark on a level floor all points at which
measurements are to be taken.
Tack or tape pieces of
paper to the floor directly under each point of
measurement on the chassis as indicated by the letter
“K” in Figs.
2.
Use a plumb bob since the points of
measurement must be accurately marked in relation to
the frame in order to obtain a satisfactory alignment
check.
After each measurement point has been carefully
marked on the floor, proceed as follows:
1.
Locate center line of chassis by measuring front and
rear end widths, using marks on floor.
If frame
widths check, draw center line on floor, full length of
chassis.
If frame widths do not check, lay out center
line as follows:
2.
Center line can be drawn through the inter-section of
any one pair of equal diagonals (A-A, B-B, C-C, D-D)
and center point of one end of frame or through
points of intersection of any two pairs of equal
diagonals.
3.
Measure distance from center line to opposite points
marked over entire length of frame.
Measurements
should not vary more than 1/8” at any point.
4.
Measuring diagonals (A-A, B-B, C-C, D-D) will
indicate point where misalign-ment occurs.
If
diagonals in each pair check within 1/8”, that part of
frame included between points of measurement may
be considered in satisfactory align-ment.
These
diagonals should intersect within 1/8” of center line.
Axle Alignment With Frame
After determining that the frame is properly aligned,
the axle alignment with the frame should be checked by
comparing diagonals.
Dimensions for side elevation of frame should be
checked at the points indicated and should not vary more
than 1/8”.
REPAIR AND REINFORCEMENTS
(Non Heat Treated Frames)
Cutting
Whenever it is necessary to cut the frame, the side
rail should be cut at an angle of 45 degrees.
This
method distributes the cut and weld over a greater area
than a cut made at right angles with the rail.
Reinforcing
Reinforcements can be made with flat, channel or
angle stock.
Because of difficulties encountered when
inserting channel reinforcements into the frame side
rails, the use of angle reinforcements is acceptable.
When ever possible, the reinforcement should extend
from the front axle to slightly beyond the rear spring front
mounting bracket
This procedure, of course, may
448
Back to Top

