TM-9-2320-260-34-1 - Page 546 of 657
TM 9-2320-260-34-1
9-4. TRANSFER REPAIR (Contd)
72.
73.
74.
75.
76.
77.
78.
79.
80.
81.
82.
83.
84.
85.
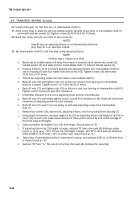
Coat housing flange (9) with light coat of sealing compound.
Position new gasket (10) on housing flange (9) and coat gasket (10) with sealing compound.
Attach chains to lifting device and to front cover (5) with three washers (4) and screws (3).
Screws (3) are set in three holes of front cover (5).
NOTE
Assistant will help with step 75.
Position front cover (5) over housing (7) alining front cover (5) over range shifter shaft (8), input
shaft (1), intermediate shaft (2), and three alinement pins (6). Start front cover (5) on housing (7).
Remove three screws (3), washers (4), and chains from front cover (5).
Using a soft-head hammer, tap around front cover (5) to seat front cover (5) on housing (7).
Install front cover (5) on housing (7) with fifteen screws (18), new lockwashers (17), and nuts (16).
Finger tighten screws (18).
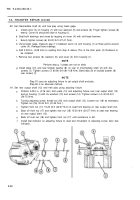
Install new lockwasher ( 14) and screw (15) on front cover (5) and housing (7). Finger tighten
screw (15).
Install six screws (13), new lockwashers (12), and nuts (11) on front cover (5) and
Finger tighten screws (13).
Tighten screws (18), (15), and (13) alternately 40-55 lb-ft (54-75 N•m).
Place collar (25) over input shaft, (1) and seat against gear inside front cover (5).
Install snapring (23) in groove on bearing (24) if removed, and install bearing (24)
shaft (1) and seat in front cover (5) as deep as snapring (23) will permit.
lousing (7).
over input
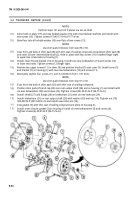
Apply light coat of sealing compound to new gasket (19) and place gasket (19) over input shaft
and aline on front cover (5).
Install bearing retainer (20) on front cover (5) with six new lockwashers (21) and screws (22).
Tighten screws (22) 40-55 lb-ft (54-75 N•m).
(1)
9-46
Back to Top


