TM-9-2320-260-34-2 - Page 121 of 863
TM 9-2320-260-34-2
15-19. CONTROL VALVE MAINTENANCE
THIS TASK COVERS:
a.
Removal
d. Assembly
b. Disassembly
e.
Installation
c. Cleaning and inspection
INITIAL SETUP
APPLICABLE MODELS
MATERIALS/PARTS (Contd)
M817
O-ring (Appendix D, Item 285)
TOOLS
Cap and plug set (Appendix C, Item 6)
General mechanic’s tool kit
REFERENCES (TM)
(Appendix B, Item 1)
LO 9-2320-260-12
MATERIALS/PARTS
TM 9-2320-260-10
Four spacer rings (Appendix D, Item 519)
TM 9-2320-260-34P-2
Fifteen lockwashers (Appendix D, Item 215)
EQUIPMENT CONDITION
Two gaskets (Appendix D, Item 94)
●
Hydraulic reservoir drained (LO 9-2320-260-12).
Gasket (Appendix D, Item 64)
●
Hoist control box removed (TM 9-2320-260-20).
a. Removal
CAUTION
Clean area around
hoses and lines before removal to prevent entry
of dirt. Damage wiII occur if dirt or dust enters system.
NOTE
●
Tag hoses for installation.
●
Have drainage container ready to catch hydraulic oil.
●
Cap or plug openings immediately after disconnecting lines and
hoses to prevent contamination. Failure to do so may result in
damage to equipment. Remove all caps or plugs prior to
connection.
1.
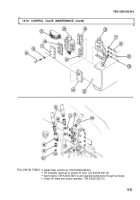
Disconnect six hoses (1) from four unions (2) and two elbows (4).
2. Remove four unions (2), two elbows (4), and tee (7) from two manifolds (3).
3. Remove drain valve (5) and bushing (6) from tee (7).
4. Remove seven screws (19), lockwashers (20), cover (21), gasket (22), control valve (8), and gasket (9)
from mounting bracket (17) and reservoir (16). Discard lockwashers (20) and gaskets (22) and (9).
NOTE
Screws attaching valve head to control valve are of different
lengths. Tag all screws for installation.
5. Remove four screws (12), lockwashers (11), two screws (13) and (14), four
lockwashers (15),
valve head (10), and gasket (18) from control valve (8). Discard
lockwashers
(11) and (15) and
gasket (18).
6. Remove two manifolds (3) from control valve (8).
b. Disassembly
1. Remove plug (23), spacer ring (24), spring (25), and plunger (26) from adapter (31). Discard spacer
ring (24).
2. Remove plug (29), spacer ring (30), spring (28) and plunger (27) from adapter (31). Discard spacer
ring (30).
3. Remove plug (32), spring (33), and ball (34) from valve cap (35).
4.
Remove valve cap (35) and spacer ring (44) from control valve body (36) and spool (43). Discard
spacer ring (44).
5. Remove nut (42), trunnion
(41), boot (40), plug (39), spacer ring (38), and O-ring (37) from spool (43).
Discard
O-ring (37) and spacer ring (38).
6. Remove spool (43) from control valve body (36).
15-60
Back to Top


