TM-9-2320-272-10 - Page 378 of 481
TM 9-2320-272-10
3-29
3-8. ENGINE SERVICE (Contd)
(2) Removal (Contd).
(a)
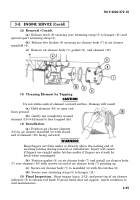
Release latch (6) securing rear retaining strap (5) to hanger (11) and
spread apart retaining strap (5).
(b)
Release five latches (8) securing air cleaner body (7) to air cleaner
manifold (4).
(c)
Remove air cleaner body (7), gasket (9), and element (10).
(3) Cleaning Element by Tapping.
CAUTION
Do not strike ends of element on hard surface. Damage will result.
(a)
Hold element (10) so open end
faces ground.
(b)
Gently tap completely around
element (10) with hand to free trapped dirt.
(4) Installation.
(a)
Position air cleaner element
(10) in air cleaner manifold (4) with closed
end of element (10) facing outward.
WARNING
Keep fingers out from under or directly above the locking end of
securing latches during removal or installation. Injury will result
if fingers are caught under latches and/or if fingers are struck by
latch when unsnapped.
(b)
Position gasket (9) on air cleaner body (7) and install air cleaner body
(7) over element (10) with arrows on end of air cleaner body (7) pointing up.
(c)
Secure air cleaner body (7) to manifold (4) with five latches (8).
(d)
Secure rear retaining strap (5) to hanger (11).
(5) Final Inspection.
Start engine (para. 2-12) and press top of air cleaner
indicator (3) to release red band. If green band does not appear, report condition to
unit maintenance.
Back to Top


