TM-9-2320-272-23-2 - Page 713 of 1417
ADJUSTMENT
NOTE
•
Perform adjustments procedure for engine models serial number 44629589 and before.
•
It may be necessary to cut on break-off screw for removal.
1.
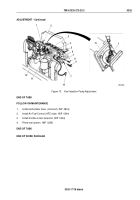
Remove safety wire (Figure 10, Item 10) from protective cap (Figure 10, Item 6). Discard safety wire.
2.
Remove break-off screw (Figure 10, Item 9), screw (Figure 10, Item 8), two lockwashers (Figure 10, Item 7),
and protective cap (Figure 10, Item 6) from manifold pressure compensator (Figure 10, Item 3). Discard
lockwashers.
3.
Install break-off screw (Figure 10, Item 9) and screw (Figure 10, Item 8) on manifold pressure compensator
(Figure
10,
Item
3) to hold stop (Figure 10, Item 11) in position during adjustment.
NOTE
Do not turn adjustment screw more than one-half turn.
4.
Hold adjusting screw (Figure 10, Item 5) and loosen locknut (Figure 10, Item 4). Turn adjusting screw one-half
turn clockwise and tighten locknut.
5.
Remove break-off screw (Figure 10, Item 9) and screw (Figure 10, Item 8) from manifold pressure compensator
(Figure 10, Item 3). Discard break-off screw.
6.
Install protective cap (Figure 10, Item 6) on manifold pressure compensator (Figure 10, Item 3) with two
lockwashers (Figure 10, Item 7), break-off screw (Figure 10, Item 9), and screw (Figure 10, Item 8).
7.
Install safety wire (Figure 10, Item 10) on protective cap (Figure 10, Item 6).
8.
Remove plug (Figure 10, Item 2) from governor housing (Figure 10, Item 1).
NOTE
Do not turn star wheel more than six clicks during adjustment.
9.
Using screwdriver, turn star wheel (Figure 10, Item 3) clockwise toward engine (Figure 10, Item 2) until six
clicks are heard.
10.
Install plug (Figure 10, Item 12) on governor housing (Figure 10, Item 1).
11.
Stamp governor housing (Figure 10, Item 1) and engine (Figure 10, Item 12) data plate with field fix FF152 to
identify fuel injection pump adjustment.
TM 9-2320-272-23-2
0242
0242-16
Back to Top

