TM-9-2320-272-23-3 - Page 1079 of 1469
REMOVAL
1.
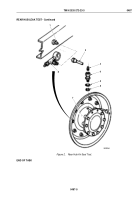
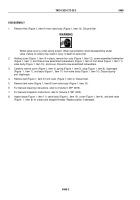
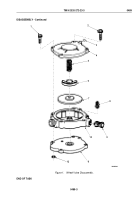
Disconnect air line (Figure 1, Item 5) from fitting (Figure 1, Item 6), and remove fitting from air manifold
(Figure
1,
Item
7).
2.
Remove two screws (Figure 1, Item 1), washers (Figure 1, Item 2), air manifold (Figure 1, Item 7), and o-ring
(Figure 1, Item 4) from dust shield (Figure 1, Item 3). Discard o-ring.
3.
Disconnect nut (Figure 1, Item 13) and tube (Figure 1, Item 8) from elbow (Figure 1, Item 12) and dust shield
(Figure 1, Item 3).
4.
Remove elbow (Figure 1, Item 12) and o-ring (Figure 1, Item 11) from adapter ring (Figure 1, Item 10).
Discard
o-ring.
5.
Remove adapter ring (Figure 1, Item 10) from spindle (Figure 1, Item 9).
6.
For General Cleaning Instructions, refer to (Volume 5, WP
0819).
7.
For General Inspection Instructions, refer to (Volume 5, WP
0819).
8.
Inspect fitting (Figure 1, Item 6), air manifold (Figure 1, Item 7), tube (Figure 1, Item 8), elbow
(Figure
1,
Item
12), and adapter ring (Figure 1, Item 10) for stripped threads, cracks, bends, or excessive
wear. Replace parts if damaged.
TM 9-2320-272-23-3
0488
0488-2
Back to Top


