TM-9-2320-272-23-3 - Page 1331 of 1469
INSTALLATION
1.
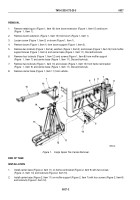
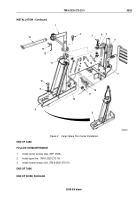
Install utility chain around upper part of carrier base (Figure 2, Item 8) and attach to a suitable lifting device.
2.
Using lifting device, lift carrier base (Figure 2, Item 8), lower onto vehicle, and align carrier base with muffler
support (Figure 2, Item 6) while installing four screws (Figure 2, Item 7) and locknuts (Figure 2, Item 18).
3.
Using a prybar to align carrier base (Figure 2, Item 8) with left frame rail bracket (Figure 2, Item 16), install two
washers (Figure 2, Item 9), screws (Figure 2, Item 10), and locknuts (Figure 2, Item 17).
4.
Remove lifting device and utility chain from carrier base (Figure 2, Item 8).
5.
Install two washers (Figure 2, Item 4), screws (Figure 2, Item 3), washers (Figure 2, Item 4), and locknuts
(Figure 2, Item 15) on muffler support bracket (Figure 2, Item 5) and carrier base (Figure 2, Item 8).
6.
Install boom (Figure 2, Item 1) on boom support (Figure 2, Item 11) with four screws (Figure 2, Item 2) and
locknuts (Figure 2, Item 19).
7.
Install boom extension (Figure 2, Item 14) on boom (Figure 2, Item 1).
8.
Install retaining pin (Figure 2, Item 13) and locking pin (Figure 2, Item 12) in boom extension
(Figure
2,
Item
14) and boom (Figure 2, Item 1).
TM 9-2320-272-23-3
0528
0528-4
Back to Top


