TM-9-2320-272-23-4 - Page 1197 of 1393
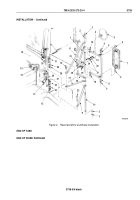
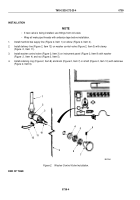
INSTALLATION
1.
Install bracket (Figure 2, Item 30) and cowl plate (Figure 2, Item 14) on cowl side panel (Figure 2, Item 16) with
two screws (Figure 2, Item 13) and two locknuts (Figure 2, Item 15).
2.
Install braces (Figure 2, Items 1, 4, 11, 17, 34, 36, and 37), and two gaskets (Figure 2, Item 18) on rod
(Figure 2, Item 10) with two washers (Figure 2, Item 2) and locknuts (Figure 2, Item 3).
3.
Install mirror braces (Figure 2, Item 37) and (Figure 2, Item 17) on cab cowl bracket (Figure 2, Item 30) with
screw (Figure 2, Item 32), washer (Figure 2, Item 26), and locknut (Figure 2, Item 27).
4.
Remove hinge screw (Figure 2, Item 33) from top door hinge (Figure 2, Item 31).
5.
Position upper mirror brace (Figure 2, Item 1) and mirror brace (Figure 2, Item 36) over upper door hinge
(Figure 2, Item 31) and install hinge screw (Figure 2, Item 33) through brace and hinge with washer
(Figure 2, Item 29) and locknut (Figure 2, Item 28).
6.
Remove hinge screw (Figure 2, Item 22) from lower door hinge (Figure 2, Item 24).
7.
Position lower mirror brace (Figure 2, Item 11) over lower door hinge (Figure 2, Item 24) and insert hinge screw
(Figure 2, Item 22) through brace and hinge and secure with washer (Figure 2, Item 23) and locknut
(Figure 2, Item 12).
8.
Install two clamp halves (Figure 2, Item 21) on upper brace (Figure 2, Item 34) with screw (Figure 2, Item 38),
lockwasher (Figure 2, Item 20), and nut (Figure 2, Item 19).
9.
Install convex mirror (Figure 2, Item 5) on clamp halves (Figure 2, Item 21) with screw assembled lockwasher
(Figure 2, Item 35).
10.
Position rearview mirror (Figure 2, Item 7) and two spacers (Figure 2, Item 6) on mirror brace
(Figure 2, Item 4) and install with two washers (Figure 2, Item 8) and locknuts (Figure 2, Item 9).
TM 9-2320-272-23-4
0738
0738-4
Back to Top


