TM-9-2320-272-23-4 - Page 303 of 1393
CLEANING AND INSPECTION
1.
For General Cleaning Instructions, refer to (Volume 5, WP
0819).
2.
Inspect all center case movable parts for proper operation. Replace any parts if damaged.
3.
Inspect rods for breaks and bends. Replace rods if damaged.
4.
Inspect moldings for cracks and bends. Replace moldings if damaged.
END OF TASK
ASSEMBLY
1.
Rustproof all inside surfaces and boxed-in areas (TB 43-0213).
NOTE
•
Apply caulking compound between exterior joints.
•
Apply adhesive to rubber and metal surfaces for installation.
•
Step (2) applies to right rear door only.
2.
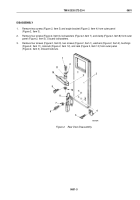
Install molding (Figure 5, Item 15) on door frame (Figure 5, Item 26) with 34 screws (Figure 5, Item 32).
NOTE
Steps (3) and (4) apply to left rear door only.
3.
Install molding (Figure 5, Item 15) on door frame (Figure 5, Item 26) with 35 screws (Figure 5, Item 32).
4.
Install weather seal (Figure 5, Item 18) on door frame (Figure 5, Item 26) with adhesive.
5.
Install moldings (Figure 5, Items 1, 2, and 3) on inner panel (Figure 5, Item 25) with adhesive.
6.
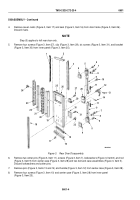
Install seal (Figure 5, Item 20), hinge (Figure 5, Item 21), seal (Figure 5, Item 22), and retainer
(Figure 5, Item 23) on door frame (Figure 5, Item 26) with 16 screws (Figure 5, Item 24).
7.
Install two spacer plates (Figure 5, Item 4) and bolt and case assemblies (Figure 5, Item 5) on inner panel
(Figure 5, Item 25) with eight screws (Figure 5, Item 6).
8.
Install center case (Figure 5, Item 28) on inner panel (Figure 5, Item 25) with four screws (Figure 5, Item 10).
9.
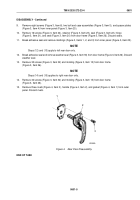
Install handle (Figure 5, Item 14) on center case (Figure 5, Item 28) with pins (Figure 5, Items 13 and 14).
10.
Install two rods (Figure 5, Item 9) on center case (Figure 5, Item 28) and two bolt and case assemblies
(Figure 5, Item 5) with two cotter pins (Figure 5, Item 11), lockwashers (Figure 5, Item 8), and screws
(Figure 6, Item 7).
11.
Install clip (Figure 5, Item 29) and bracket (Figure 5, Item 30) on outer panel (Figure 5, Item 19) with four screws
(Figure 5, Item 27) and six screws (Figure 5, Item 31).
12.
Install seal (Figure 5, Item 16) on door frame (Figure 5, Item 26) with seven rivets (Figure 5, Item 17).
TM 9-2320-272-23-4
0601
0601-6
Back to Top


