TM-9-2320-272-23-4 - Page 305 of 1393
ASSEMBLY - Continued
NOTE
Step (13) applies to right rear door only.
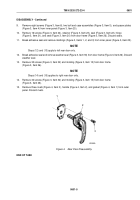
13.
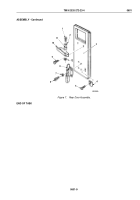
Install gasket (Figure 6, Item 1) and handle (Figure 6, Item 2) on outer panel with three rivets
(Figure
6,
Item
3).
3
M9934DAA
1
2
Figure 6.
Rear Door Assembly.
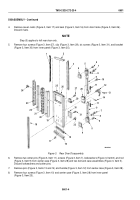
14.
Install rack (Figure 7, Item 10) on outer panel (Figure 7, Item 3) with four screws (Figure 7, Item 9), bushings
(Figure 7, Item 11), washers (Figure 7, Item 2), two screws (Figure 7, Item 1), and locknuts (Figure 7, Item 12).
15.
Install clamp (Figure 7, Item 8) on outer panel (Figure 7, Item 3) with four screws (Figure 7, Item 6) and
lockwashers (Figure 7, Item 7).
16.
Install two angle brackets (Figure 7, Item 4) on outer panel (Figure 7, Item 3) with two screws
(Figure 7, Item 5).
TM 9-2320-272-23-4
0601
0601-8
Back to Top

