TM-9-2320-272-23-4 - Page 617 of 1393
REMOVAL
NOTE
Tag wires for installation.
1.
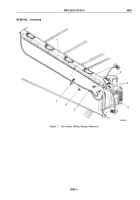
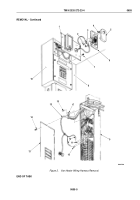
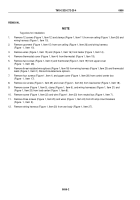
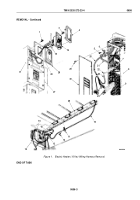
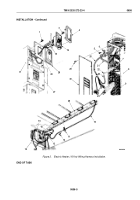
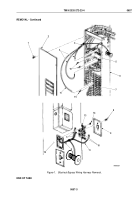
Remove 12 screws (Figure 1, Item 12) and clamps (Figure 1, Item 11) from van ceiling (Figure 1, Item 26) and
wiring harness (Figure 1, Item 10).
2.
Remove grommet (Figure 1, Item 15) from van ceiling (Figure 1, Item 26) and wiring harness
(Figure
1,
Item
10).
3.
Remove wires (Figure 1, Item 15) and (Figure 1, Item 16) from heater (Figure 1, Item 14).
4.
Remove thermostat cover (Figure 1, Item 4) from thermostat (Figure 1, Item 19).
5.
Remove two screws (Figure 1, Item 3) and thermostat (Figure 1, Item 19) from upper cover
(Figure
1,
Item
28).
6.
Remove three insulated wire splicers (Figure 1, Item 18) from wiring harness (Figure 1, Item 20) and thermostat
leads (Figure 1, Item 2). Discard insulated wire splicers.
7.
Remove four screws (Figure 1, Item 1) and upper cover (Figure 1, Item 28) from control center box
(Figure
1,
Item
17).
8.
Remove six screws (Figure 1, Item 29) and cover (Figure 1, Item 30) from load center (Figure 1, Item 18).
9.
Remove screw (Figure 1, Item 5), clamp (Figure 1, Item 6), and wiring harnesses (Figure 1, Item 21) and
(Figure 1, Item 20) from load center (Figure 1, Item 8).
10.
Remove screw (Figure 1, Item 22) and wire (Figure 1, Item 23) from neutral bus (Figure 1, Item 7).
11.
Remove three screws (Figure 1, Item 25) and wires (Figure 1, Item 24) from 20 amp circuit breakers
(Figure
1,
Item
9).
12.
Remove wiring harness (Figure 1, Item 20) from van body (Figure 1, Item 27).
TM 9-2320-272-23-4
0656
0656-2
Back to Top

