TM-9-2320-272-24-1 - Page 440 of 1015
TM 9-2320-272-24-1
3-24. FUEL SELECTOR VALVE, MOUNTING BRACKET, AND INDICATOR PLATE
MAINTENANCE
THIS TASK COVERS:
a. Removal
b. Inspection
c. Installation
INITIAL SETUP:
APPLICABLE MODELS
M929/A1/A2, M930/A1/A2, M931/A1/A2,
M932/A1/A2, M936/A1/A2
TM 9-2320-272-24P
TOOLS
General mechanic’s tool kit (Appendix E, Item 1)
MATERIALS/PARTS
EQUIPMENT CONDITION
l
Parking brake set (TM 9-2320-272-10).
l
Selector valve flex hoses removed (para. 3-23).
One lockwashers (Appendix D, Item 352)
Two lockwashers (Appendix D, Item 354)
Two locknuts (Appendix D, Item 313)
Antiseize tape (Appendix C, Item 72)
GENERAL SAFETY INSTRUCTIONS
Diesel fuel is flammable. Do not perform this
procedure near flames.
REFERENCES (TM)
TM 9-2320-272-10
WARNING
Diesel fuel is highly flammable. Do not perform fuel system
procedures near open flame. Injury to personnel may result.
1.
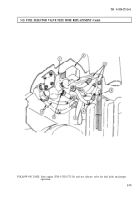
Remove screw (1), lockwasher (2), and lever (3) from left rear cab floor (5). Discard
lockwasher (2).
2.
Remove two screws (12), lockwashers (11), and selector valve (9) from mounting bracket (10).
Discard lockwashers (11).
3.
Remove two locknuts (13), screws (15), washers (14), indicator plate (4), and mounting bracket (10)
from cab floor (5). Discard locknuts (13).
NOTE
l
Use soft-nosed vise to hold selector valve.
l
Tag fittings for installation.
4.
Remove two elbows (7), pipe nipples (6), and elbows (8) from fuel selector valve (9).
1.
Install lever (3) on selector valve (9) with screw (1).
2.
Turn lever (3) left, then right, while checking inside of selector valve (9) for burrs and nicks. Replace
selector valve (9) if nicked or burred.
3.
Remove screw (1) and lever (3) from selector valve (9).
4.
Inspect two pipe nipples (6) and elbows (7) and (8) for stripped threads. Replace any part if threads
are stripped.
3-76
Back to Top

