TM-9-2320-272-24-2 - Page 352 of 991
TM 9-2320-272-24-2
3-391. CRANE HYDRAULIC FILTER MAINTENANCE
THIS TASK COVERS:
a. Removal
b. Disassembly
c. Cleaning and Inspection
d. Assembly
e. Installation
INITIAL SETUP:
APPLICABLE MODELS
M936/A1/A2
TOOLS
General mechanic’s tool kit (Appendix E, Item 1)
MATERIALS/PARTS
O-ring (Appendix D, Item 435)
O-ring (Appendix D, Item 434)
Ring seal (Appendix D, Item 541)
Drycleaning solvent (Appendix C, Item 71)
PERSONNEL REQUIRED
TWO
REFERENCES (TM)
LO 9-2320-272-12
TM 9-2320-272-10
TM 9-2320-272-24P
EQUIPMENT CONDITION
Parking brake set (TM 9-2320-272-10).
GENERAL SAFETY INSTRUCTIONS
l
Wear eyeshields during replacement of crane
hydraulic filter.
l
Keep fire extinguisher nearby when using dry-
cleaning solvent.
l
When cleaning with compressed air, wear
eyeshields and ensure source pressure does not
exceed 30 psi (207 kPa).
Hydraulic filter assembly is under great pressure and oil will spurt
out from housing during removal. Wear eyeshields during removal
of assembly, Failure to do this may cause injury to personnel.
NOTE
l
Mechanic must hold filter cover firmly in place while assistant
removes screws. Cover and attached filter assembly must be
pulled quickly from housing. A shutoff valve inside housing
stops oil flow immediately after filter assembly is removed.
l
Have drainage container ready to catch oil.
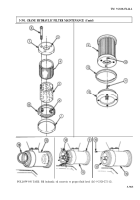
1.
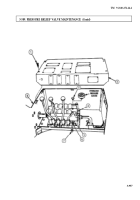
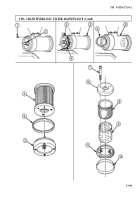
While holding filter cover (2) in place, direct assistant to remove four screws (1) from filter cover (2).
2.
Pull filter cover (2) with filter assembly (4) quickly from filter housing (3).
3.
Remove O-ring (5) from rear of filter housing (3). Discard O-ring (5).
1.
Place filter cover (2) with filter assembly (4) on flat surface.
2.
Pull filter assembly (4) straight up to separate from filter cover (2).
3.
Remove O-ring (6) from filter cover (2). Discard O-ring (6).
4.
Remove three screws (7), rear cap (12), front cap (11), and ring seal (10) from filter element (8).
Discard ring seal (10).
5.
Remove filter element (8) from shroud (9).
3-960
Back to Top

