TM-9-2320-272-24-2 - Page 524 of 991
TM
9-2320-272-24-2
3-439. EUROPEAN MINI-LIGHTING KIT REPLACEMENT
THIS TASK COVERS:
a. Removal
b. Installation
APPLICABLE MODELS
All
TOOLS
REFERENCES (TM)
TM 9-2320-272-10
TM 9-2320-272-24P
General mechanic’s tool kit (Appendix E, Item 11
EQUIPMENT CONDITION
MATERIALS/PARTS
Parking brake set (TM 9-2320-272-10).
Battery ground cable disconnected (para. 3-126).
Locknut (Appendix D, Item 294)
Four locknuts (Appendix D, Item 299)
Lockwasher (Appendix D, Item 378)
Two screw-assembled lockwashers
(Appendix D, Item 577)
Two O-rings (Appendix D, Item 436)
NOTE
Right and left European mini-lights are replaced the same. This
procedure covers the right side.
NOTE
Note routing of leads through grommet and fender for installation.
1.
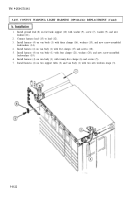
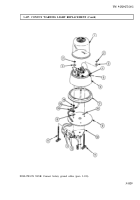
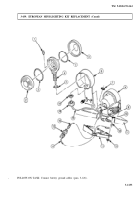
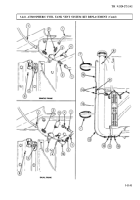
Remove two lenses (2), O-rings (3), and lamp (1) from lamp housing (4). Discard O-rings (3).
2.
Remove four locknuts (13) and protector box (14) from four screws (10) on fender (11). Discard
locknuts (13).
3.
Disconnect lead (16) and cable (12) from connector (15).
4.
Disconnect cable (12) from lead (9).
5.
Remove grommet (7) from leads (16) and (9) and fender (11).
6.
Remove locknut (18), lockwasher (19), lamp housing (4), and washer (5) from brush guard (6).
Discard locknut (18) and lockwasher (19).
7.
Remove two screw-assembled lockwashers (17) and brush guard (6) from brush guard (8). Discard
screw-assembled lockwashers (17).
1.
Install brush guard (6) on brush guard (8) with two new screw-assembled lockwashers (17).
2.
Install washer (5) and lamp housing (4) on brush guard (6) with new lockwasher (19) and new
locknut (18).
3.
Install grommet (7) on leads
(16) and (9) and fender (11).
4.
Connect cable (12) to lead (9).
5.
Connect lead (16) and cable (12) to connector (15).
6.
Install protector box (14) on fender (11) and four screws (10) with four new locknuts (13).
NOTE
Ensure red lens of light assembly is installed facing rear of
vehicle.
7.
Install lamp (11, two new O-rings (3), and lenses (2) on lamp housing (4).
3-1132
Back to Top

