TM-9-2320-272-24-4 - Page 32 of 836
TM 9-2320-272-24-4
5-6. FUEL INJECTOR SLEEVE MAINTENANCE
THIS TASK COVERS:
a. Removal
b. Bead Cutting
c. Installation
d. Fitting and Forming
e. Check and Test
INITIAL SETUP:
APPLICABLE MODELS
M939lAl
SPECIAL TOOLS
Bead cutting tool (Appendix E, Item 9)
Injector sleeve expander tool (Appendix E,
Item 73)
Injector sleeve cutter (Appendix E, Item 72)
Injector protrusion gauge (Appendix E, Item 53)
Injector sleeve holding tool (Appendix E,
Item 74)
Injector sleeve installation mandrel (Appendix
E, Item 75)
Injection sleeve extractor (Appendix E,
Item 67)
TOOLS
General mechanic’s tool kit (Appendix E, Item 1)
Torque wrench (Appendix E, Item 146)
Dial indicator (Appendix E, Item 36)
Drill press
MATERIALS/PARTS
Injector sleeve (Appendix D, Item 257)
Injector sleeve O-ring (Appendix D, Item 478)
Cutting oil (Appendix C, Item 26)
Lubricating oil (Appendix C, Item 50)
Prussian blue (Appendix C, Item 54)
REFERENCES (TM)
TM 9-2320-272-24P
EQUIPMENT CONDITION
Cylinder head disassembled (para. 5-3).
1.
2.
3.
4.
5.
6.
7.
8.
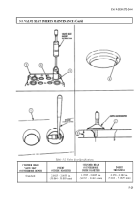
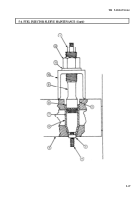
Place cylinder head (5) on workbench with exhaust manifold side down.
Insert tapered end of lower puller collar (7) into injector sleeve (6).
Insert upper puller collar (9) on top of collar (7) with threaded end out.
Position support bridge (10) over threaded end of collar (9) with one hand holding support
bridge (10) legs against cylinder head (5) and install washer (11) and nut (12). Tighten nut (12)
finger tight.
While holding support bridge (10) insert threaded rod (4) through holes in collars (7) and (9).
Install hex nut (1) and extractor tip (3) on threaded rod (4) and tighten. Ensure extractor tip (3) is
seated firmly against injector sleeve (6) bottom.
Tighten nut (1) to remove injector sleeve (6). Discard injector sleeve (6).
Remove O-ring (8) from injector sleeve bore (2). Discard O-ring (8).
5-26
Back to Top

