TM-9-2320-272-24-4 - Page 26 of 836
TM 9-2320-272-24-4
5-4. INTAKE AND EXHAUST VALVES REFACING (Contd)
1.
2.
3.
4.
5.
6.
7.
8.
9.
10.
11.
12.
NOTE
Mark on ground face of valve. Mark is used to determine head
or stem warpage.
For operating instructions of valve refacer, refer to
TM 9-4910-484-10.
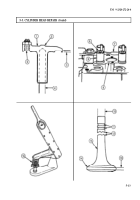
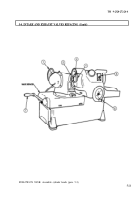
Install valve (3) stem in chuck (2).
Turn switch (5) of valve refacer to ON to start valve grinder electric motor.
NOTE
An out-of-round condition of valve will be marked by a small
bright spot on valve seating surface of valve head.
Turn grinder wheel handle (6) and very lightly touch valve (3) face with grinder wheel (4).
Move grinder wheel (4) away from valve head and switch valve grinder electric motor to OFF with
valve refacer switch (5).
Indicate location of small bright spot on ground face of valve (3).
Rechuck valve (3) 180° from first position and mark new position on valve (3).
Turn valve refacer switch (5) to ON to start valve refacer electric motor.
Turn grinder wheel (4) handle (6) and very lightly touch valve (3) face with grinder wheel (4).
Move grinder wheel (4) away from valve (3) head and switch grinder electric motor to OFF with
switch (5).
If bright spot is in the same position after both chucking operations, the valve (3) is warped. If valve (3)
is warped, replace valve (3).
If bright spots occur in different positions, the chuck (2) is out of alignment or the valve (3) is being
incorrectly chucked. Run-out should not exceed 0.0001 in. (0.0254 mm).
NOTE
Use valve refacer handle for left and right motion of valve.
Wet grind valves (3) to an exact 30° angle from horizontal and check valve (3) head rim thickness
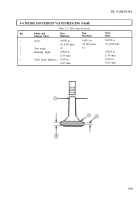
with wheel handle (7) controlling depth of grind (table 5-l).
NOTE
Keep valves in order in a numbered valve stick or board.
NOTE
Do not use cloth to wipe valves clean.
1.
Clean refaced valves (3). For general cleaning instructions, refer to para. 2-14.
5-20
Back to Top

