TM-9-2320-280-20-2 - Page 175 of 951
Tools
General mechanic’s tool kit:
automotive (Appendix B, Item 1)
Special Tools
Hex-head driver, 3/16 in.
(Appendix B, Item 163)
Materials/Parts
Lockwasher (Appendix G, Item 133)
Two lockwashers (Appendix G, Item 183)
Three lockwashers (Appendix G, Item 188)
Five lockwashers (Appendix G, Item 178)
Sealing compound (Appendix C, Item 44)
Adhesive sealant (Appendix C, Item 3)
Personnel Required
One mechanic
One assistant
Manual References
TM 9-2320-280-10
TM 9-2320-280-24P
Equipment Condition
• Battery ground cable disconnected
(para. 4-73).
• Hood raised and secured
(TM 9-2320-280-10).
General Safety Instructions
Alternator must be supported during removal
and installation.
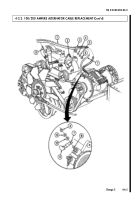
4-2. 60 AMPERE ALTERNATOR MAINTENANCE
This task covers:
a. Removal
c.
Adjustment
b. Installation
INITIAL SETUP:
TM 9-2320-280-20-2
4-2
Change 3
NOTE
Prior to removal, tag leads for installation.
1.
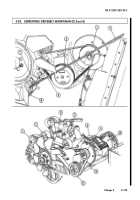
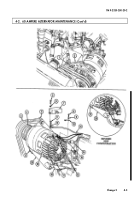
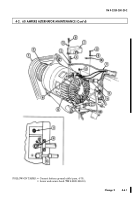
Loosen capscrew (1) on alternator adjusting bracket (2) and two capscrews (17) on alternator
mounting bracket (20) and support bracket (18).
NOTE
Perform step 2 for vehicles with revised configurations.
2.
Loosen capscrew (1) on alternator adjusting bracket (2) and nut (21) on alternator mounting
bracket (20) and support bracket (18).
3.
Remove two drivebelts (3) from alternator pulley (4).
4.
Remove two screws (8), lockwashers (9), and wire retaining strap (10) from alternator (19). Discard
lockwashers (9).
5.
Remove two screws (5) and lockwashers (6) from terminal cover (7). Discard lockwashers (6).
6.
Pry cover (7) away from waterproofing adhesive and remove cover (7).
7.
Remove waterproofing adhesive around terminals (16).
8.
Disconnect lead 568A (15) at engine wiring harness (14).
9.
Remove capscrew (11) and lockwasher (12) securing ground 3B (13) to alternator (19) and
disconnect ground 3B (13) from alternator (19). Discard lockwasher (12).
a. Removal
Back to Top


