TM-9-2320-280-20-2 - Page 201 of 951
TM 9-2320-280-20-2
4-12
Change 3
4-5. PROTECTIVE CONTROL BOX MAINTENANCE
This task covers:
a. Removal
c. Installation
b. Inspection
CAUTION
The control box must be supported from inside the vehicle during
removal and installation or damage to protective control box/unit
may result.
1.
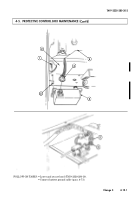
Working under hood, disconnect engine wiring harness cannon plug (6) from control box (5).
2.
From inside the vehicle, disconnect body wiring harness cannon plug (3) from control box (5).
3.
Remove four screws (1) and control box (5) from cowl (2).
Inspect rivnuts (5.1) for damage. Replace rivnuts (5.1) if damaged (para. 10-66).
1.
Position control box (5) under instrument panel (4) against cowl (2).
2.
From under hood, install control box (5) on cowl (2) with four screws (1). Tighten screws (1)
to 6 lb-ft (8 N
•
m).
3.
Fill engine wiring cannon plug (6) and control box connection (5) to capacity with silicone.
4.
From inside vehicle, connect body wiring harness cannon plug (3) to control box (5).
5.
Connect engine wiring harness cannon plug (6) to control box (5).
c. Installation
b. Inspection
a. Removal
INITIAL SETUP:
Tools
General mechanic’s tool kit:
automotive (Appendix B, Item 1)
Materials/Parts
Silicone compound (Appendix C, Item 48)
Personnel Required
One mechanic
One assistant
Manual References
TM 9-2320-280-10
TM 9-2320-280-24P
Equipment Condition
• Battery ground cable disconnected (para. 4-73).
• Hood raised and secured (TM 9-2320-280-10).
Back to Top


