TM-9-2320-280-20-3 - Page 154 of 1168
10-80. MIRROR ARM ASSEMBLY REPLACEMENT
Manual References
TM 9-2320-280-24P
Equipment Condition
Mirror removed (para. 10-79).
This task covers:
a. Removal
b.
Installation
a. Removal
1.
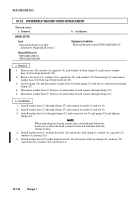
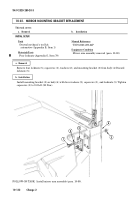
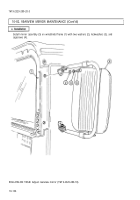
Remove special nut (1), lockwasher (2), and washer (3) from pivot bracket (4) and mounting
bracket (5). Discard lockwasher (2).
2.
Remove mirror arm (7), pivot bracket (4), and flat washer (6) from mounting bracket (5). Discard
flat washer (6).
3.
Remove nut (10), lockwasher (11), capscrew (8), two spacers (9), and mirror arm (7) from pivot
bracket (4). Discard lockwasher (11).
b. Installation
1.
Install two spacers (9) and mirror arm (7) on pivot bracket (4) with capscrew (8), lockwasher (11),
and nut (10). Tighten nut (10) to 15 lb-ft (20 N
•
m).
2.
Install flat washer (6), pivot bracket (4), and mirror arm (7) on mounting bracket (5) with
washer (3), lockwasher (2), and special nut (1).
FOLLOW-ON TASK: Install mirror (para. 10-79).
TM 9-2320-280-20-3
Change 2
10-131
INITIAL SETUP:
Tools
General mechanic’s tool kit:
automotive (Appendix B, Item 1)
Materials/Parts
Lockwasher (Appendix G, Item 134)
Lockwasher (Appendix G, Item 133)
Flat washer (Appendix G, Item 39)
1
2
3
4
5
6
7
8
4
11
10
7
9
Back to Top


